At 4 a.m., a homeowner in Sun City calls after a Williamson County flash flood pushes water into the living room. The first visit looks manageable: standing water, wet laminate, stained drywall, and a strong odor near the baseboards. By the third day, the laminate has buckled, the subfloor is holding moisture, and the odor has changed. The adjuster wants to know what was wet at the start, what your crew removed, which readings justified the equipment, and when the affected areas reached acceptable dry conditions.
That's the documentation problem in water restoration. The loss isn't static. Moisture migrates, materials swell, metal fixtures oxidize, odors develop, and hidden damage appears after demolition. A photo folder can show activity, but it rarely proves the relationship between condition, action, measurement, and result. Progress documentation has to create that relationship in a format another person can verify without guessing.
Construction records have long served this purpose. A U.S. construction documentation manual describes daily records covering manpower, equipment, materials, observations, communications, measurements, calculations, photographs, and the events of each workday. That same recordkeeping model connects progress reports with completion status, payment verification, productivity measurement, and claims support.
Why a Water Loss in Georgetown Changes Every 24 Hours
A Georgetown water loss can look like one event on the first call and a different project at every subsequent visit. Central Texas flash-flood conditions may leave exterior soil saturated while humid indoor air slows evaporation. Water can move behind baseboards, into wall cavities, beneath flooring, and along slab edges before anyone sees a new stain.
The field crew needs to document those changes rather than photograph the newest symptom. On day one, the record might show the source, standing water, affected rooms, material categories, initial moisture readings, and equipment placement. On the next visit, it should show what changed, what work was performed, and whether the readings moved in the expected direction.
The first visit establishes the argument
A wide photograph identifies the room and its condition. Close-ups show swelling, staining, delamination, or visible contamination. Moisture readings give the condition a measurable reference, while the written log explains what the crew did in response. Without that baseline, a later reviewer may see wet materials but have no reliable way to determine whether the condition existed before mitigation.
The first 24 hours after water damage in Georgetown often determine how clearly the rest of the file will read. Mark reference points, record the room names consistently, and photograph adjacent areas that appear unaffected. Those unaffected areas provide useful comparison points when conditions evolve.
Field rule: If a later reviewer can't tell where a reading was taken, when it was taken, and what action followed, the reading has limited claim value.
Change is part of the record
Within a day, a wet cabinet toe-kick may require removal. A subfloor may show more swelling after flooring is lifted. A dehumidifier may need to move from a living room to a garage or another affected zone. Each change needs a trigger, not just a final photograph.
The strongest progress documentation follows the physical story: initial condition, intervention, repeat measurement, scope decision, and final verification. That sequence helps an adjuster distinguish necessary mitigation from unexplained work and gives the project manager a defensible record when coverage questions arise.
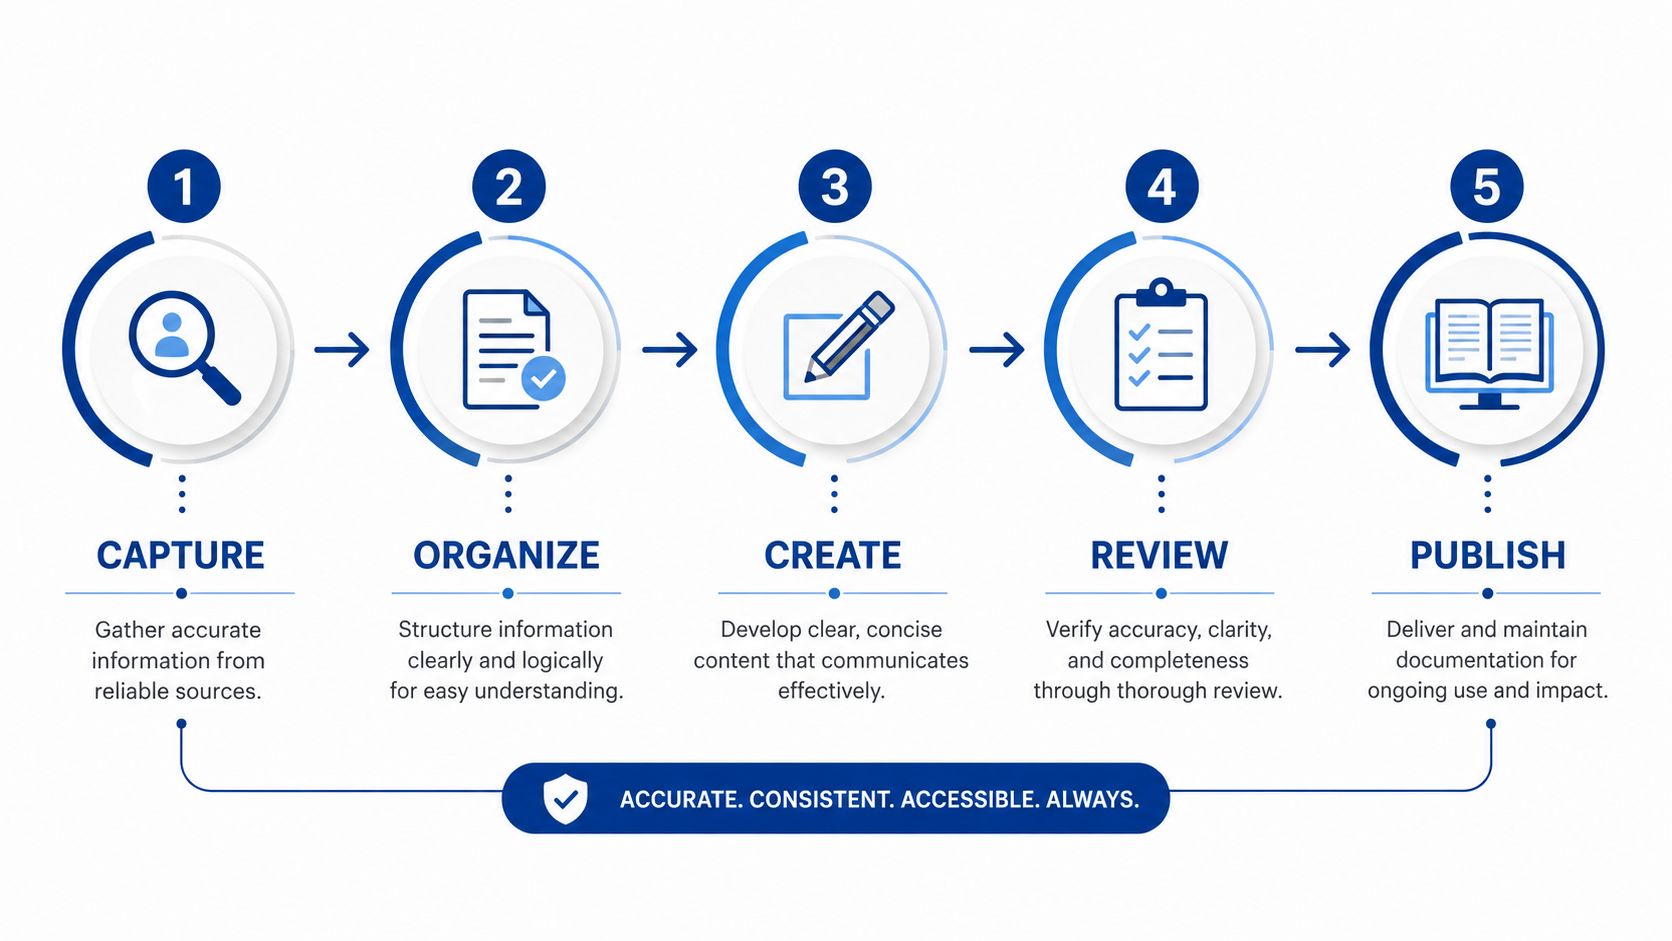
The Five-Step Documentation Workflow That Holds Up
A reliable workflow starts before the first piece of equipment arrives. Restoration monitoring guidance recommends defining the area of interest, choosing consistent indicators, collecting baseline data, repeating validated observations at intervals, and reporting the results in a decision-ready format. It also emphasizes SMART objectives, standardized reporting, and photographs that substantiate whether the work matched the plan, as described in restoration monitoring guidance from the U.S. Fish and Wildlife Service and USGS.
1. Define the area of interest
List every affected room, assembly, and adjacent comparison area. Use names such as “first-floor living room,” “hallway baseboard,” or “master bedroom exterior wall,” not vague labels such as “downstairs” or “wet area.” Mark where readings will be repeated so the comparison remains meaningful.
2. Establish the baseline
Before extraction or demolition changes the scene, capture the source, visible damage, contents, room conditions, and initial moisture readings. Record the instrument used, the material tested, and the exact reference point. A baseline gives the later readings something to measure against.
3. Capture repeatable inputs
At each visit, repeat the same room-level observations where possible. Photograph the same reference points, record moisture and ambient conditions, note equipment operating in the space, and identify the technician or project manager completing the entry.
4. Record scope changes when they happen
A scope change should explain what appeared, when it appeared, why it mattered, and what action followed. If removing a wet baseboard reveals moisture in the wall cavity, photograph the discovery before opening further, record the readings, and connect the decision to the affected assembly.
5. Report for a decision
The final output shouldn't be a raw upload. Lead with a concise summary, then provide an indexed evidence folder containing photos, readings, logs, equipment records, and approvals. Documentation guidance warns against stale requirements, missing context, and inaccessible records. A current, usable file supports decisions better than a larger file that nobody can use.
What to Capture Each Visit and How to Name the Files
Every visit should produce four connected artifact types. The point isn't to create paperwork for its own sake. The point is to let someone match a room, a condition, a measurement, and an action without opening unrelated files.
Start with a wide room photograph. It establishes orientation and shows equipment placement, affected assemblies, and the relationship between damaged and undamaged areas. Add close-ups of swelling, staining, separation, microbial concern, demolition exposure, or any condition that affects scope.
The third artifact is the moisture record. Name the material and reference point, not just the percentage or meter display. “Living room, east wall, lower drywall, beside window” is useful. “Living room reading” isn't.
The fourth is a short written entry. Include personnel, equipment, observations, actions taken, access issues, and the next decision. If a machine was added, removed, relocated, or found offline, say so in the same visit record.
Use one naming system in the field
A practical convention is:
YYYYMMDD_HHMM_SiteID_Room_Descriptor_PhotoNumber
Use matching suffixes for related files:
- Photo:
20260825_0930_GTX014_LivingRoom_WallMoisture_01.jpg - Meter record:
20260825_0930_GTX014_LivingRoom_WallMoisture_Meter.csv - Daily log:
20260825_0930_GTX014_LivingRoom_WallMoisture_Log.pdf - Equipment record:
20260825_0930_GTX014_LivingRoom_WallMoisture_Equipment.pdf
The exact Site ID can follow your company's system. Consistency matters more than the label. Sync the camera clock with the phone, verify the meter's date and time, and enable location tagging when company policy and privacy requirements permit it.
| Artifact | Required Fields | File Name Pattern |
|---|---|---|
| Wide photo | Date, time, site, room, orientation, condition | YYYYMMDD_HHMM_SiteID_Room_Wide_## |
| Close-up photo | Material, defect, reference point, condition | YYYYMMDD_HHMM_SiteID_Room_Descriptor_## |
| Moisture reading | Material, location, instrument, result, operator | YYYYMMDD_HHMM_SiteID_Room_Reading |
| Daily log | Personnel, equipment, actions, observations, next step | YYYYMMDD_HHMM_SiteID_Room_Log |
Document outdoor reference points during the initial visit when they affect interpretation, including saturated soil, exterior humidity, HVAC condensate conditions, or storm exposure. Name every file before leaving the property. Renaming a memory card full of anonymous images at the office is where room labels, timestamps, and context disappear.
Organizing Records So Adjusters Can Find Evidence Fast
Date-first folders match the technician's work rhythm. After each visit, the crew opens a new folder and drops in that day's photos, logs, and readings. The structure feels orderly internally, but an adjuster usually reviews the file by room, assembly, scope item, and decision.
On a two-story Georgetown loss, a date-first system can force the reviewer to open separate folders for each visit before verifying the master bedroom's drying history. A room-first system puts the master bedroom's initial photos, repeat readings, equipment notes, demolition records, and completion evidence together. The reviewer can still follow the timeline because each item carries a timestamp.
The hybrid structure works better
Use rooms as the primary context and dates as the progression layer:
01_Master_Bedroom20260825_Initial20260826_Drying20260827_Scope_Change20260828_Final
02_Living_Room20260825_Initial20260826_Drying
03_CommonEstimateApprovalsEquipmentCompletion_Report
This approach works whether the team uses a shared drive, Job-Dox, Encircle, or another claims platform. Keep a separate common folder for the estimate, authorizations, correspondence, equipment inventory, and final report. Room folders should contain evidence specific to that space, not duplicate administrative documents.
| Structure | Top-Level Folder | Subfolder Logic | Best For | Adjuster Friction |
|---|---|---|---|---|
| Date-first | Visit date | Photos, readings, logs by day | Crew activity tracking | High, because room history is scattered |
| Room-first | Room or assembly | Initial, drying, change, final | Claims review and handoff | Low, because evidence follows the affected space |
| Hybrid | Room plus common records | Date-stamped visit folders inside rooms | Full project lifecycle | Lowest, when naming stays consistent |
Moisture readings only help when the location and material are clear. The moisture meter reading guide is useful as a field reference, but your project file still needs the actual instrument result, room label, reference point, and date.
Building the Completion Report Adjusters Actually Read
A completion report should answer the adjuster's first questions on the opening page. What happened, what areas were affected, what work was completed, what drying objective was used, and what evidence supports the conclusion?
Put the job summary first. Identify the loss type, source if known, affected rooms, mitigation dates, drying goals, equipment period, unresolved conditions, and customer status. Don't bury the decision in a long sequence of photographs.
Put the evidence in review order
A practical packet can follow this order:
- Executive summary, with loss description, affected areas, work completed, and outstanding items.
- Initial scope of work, including source information, material observations, and baseline readings.
- Psychrometric drying log, with ambient conditions, equipment activity, and daily observations.
- Room-level photo manifest, linking each image to its location and purpose.
- Moisture maps, showing initial, intermediate, and final readings by material and reference point.
- Equipment log, including placement, serial numbers, relocation, removal, and customer acknowledgment.
- Scope-change documentation, with trigger, photos, readings, estimate connection, and written approval where available.
- Final verification, including final readings, completion photographs, site condition, and sign-off.
- Invoices, receipts, disposal records, and supporting correspondence, organized behind the technical evidence.
The water-damage insurance claim guidance from RestoTek TX reflects the practical records property owners commonly need, including loss photographs, moisture documentation, scope information, invoices, and receipts. The packet should make those records easy to locate rather than requiring the reviewer to reconstruct the job from attachments.
Omissions create avoidable delays
Missing pre-dry readings weaken the comparison between starting condition and completion. Unsigned change orders leave added work without a clear authorization trail. Equipment records without room placement don't explain what the machines were accomplishing, while final photographs without final readings show appearance but not dry-out verification.
Progress documentation also carries business consequences beyond one claim. Industry reporting cites a Project Management Institute figure that 33% of projects fail because of poor communication, with inadequate documentation identified as a primary factor, and reports a McKinsey finding that poorly documented requirements are associated with 60% more cost overruns than thorough requirements documentation. Those figures come from industry reporting on project documentation mistakes. For restoration, the practical lesson is simple: update the file as the work changes, not after memory has filled the gaps.
The Hidden Cost of Too Many Photos and How to Avoid It
More photos don't automatically make a claim stronger. A large image dump can hide the important evidence, create conflicting timestamps, and force the adjuster to decide which repeated angles matter.
A field team may upload several nearly identical photographs of a dehumidifier in the same position. If the next visit contains the same views, the reviewer may reasonably ask whether conditions changed, whether the equipment moved, or whether the crew performed measurable work during the interval. The problem isn't the camera. It's the absence of selection and explanation.
Photograph decisions, not just surfaces
Each image should support a decision or establish a comparison. A useful visit set might include:
- Orientation: one wide image that identifies the room and affected assembly.
- Condition: one or more close-ups showing the material issue.
- Measurement: a readable meter display paired with a location reference.
- Action: equipment placement, material removal, containment, or access opening.
- Progress: the same reference point photographed again when conditions change.
- Completion: the final condition after verification and cleanup.
The right count depends on the size and complexity of the loss. The practical ceiling for a routine visit is roughly eight to twelve purposeful images, but that range is a field discipline, not a rule that overrides judgment. A large loss needs more evidence. A simple room may need less.
Make every image earn its place
Use captions that explain what the reviewer should notice: “Master bedroom, north exterior wall, lower drywall, repeated reading point, equipment operating.” Keep metadata intact, synchronize device clocks, and avoid editing that removes the original file context.
Recent guidance describes a move away from before-and-after photos alone toward room-level timelines, equipment logs, moisture maps, and daily progress records for water-loss claims, as outlined in water-damage insurance documentation guidance. The evidence chain matters more than volume. A smaller, labeled set tied to readings and scope changes is easier to verify than hundreds of disconnected images.
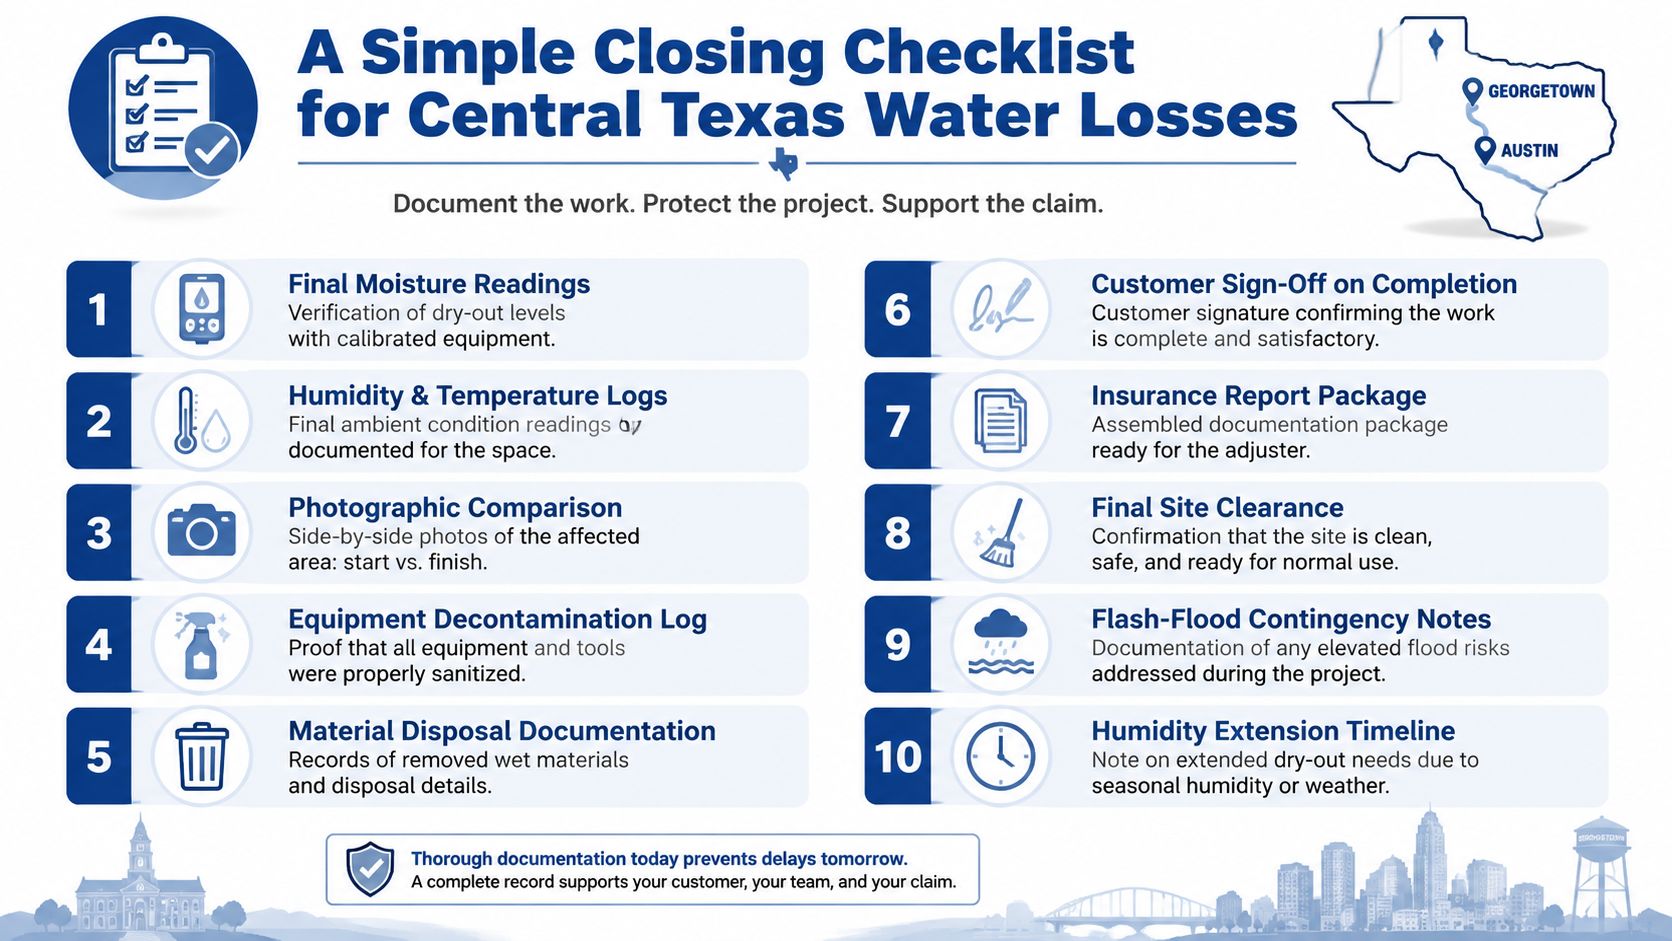
A Simple Closing Checklist for Central Texas Water Losses
Before the final walkthrough, the project manager should be able to answer every basic question without searching through the entire claim file. Georgetown and Austin losses often involve storm exposure, humid conditions, changing scope, and multiple stakeholders. The checklist needs to capture the job's physical history and the decisions made along the way.
- Final moisture readings: Record dry-out verification by room, material, and reference point.
- Humidity and temperature logs: Preserve the final ambient readings and the conditions affecting interpretation.
- Photographic comparison: Include matched start and finish views, not unrelated final photographs.
- Equipment decontamination log: Record cleaning or sanitization actions for equipment leaving the site.
- Material disposal documentation: Identify removed wet materials and retain disposal records.
- Customer sign-off: Obtain written acknowledgment of completed work and any remaining conditions.
- Insurance report package: Assemble the scope, readings, photos, logs, approvals, invoices, and receipts.
- Final site clearance: Document that affected spaces were cleaned, safe to access, and ready for the next phase.
- Flash-flood contingency notes: Explain risks, exterior conditions, access issues, and newly discovered damage.
- Humidity extension timeline: Note why drying continued when ambient conditions slowed progress and connect the explanation to daily readings.
Keep psychrometric readings in the file when outdoor humidity stays above 70% overnight, because the ambient condition helps explain a longer drying timeline. Flag wood subfloor readings above 16% beside exterior walls, and identify the exact locations and repeat dates rather than placing a single unexplained number in the report.
The final review should confirm that every major action has a date, every reading has a location, every scope change has a trigger, and every conclusion points to supporting evidence. That's what turns progress documentation into a claim record an adjuster can verify.
RestoTek TX handles water damage inspection, extraction, structural drying, microbial prevention, and reconstruction for Georgetown, Austin, and surrounding Central Texas communities. If you need a restoration file built around moisture maps, equipment logs, scope changes, and completion evidence, contact the family-operated team and visit RestoTek TX to request service or an estimate.