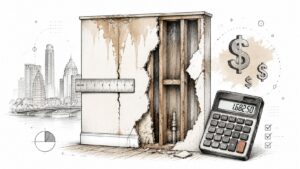
Most homeowners pay $300 to $2,300 per wall for water-damaged wall repair, but the cost is primarily influenced by two factors: how far the water traveled and whether it was clean, gray, or black water. A small clean-water leak can stay relatively contained, while contaminated water or hidden moisture inside the wall can turn a modest repair into a much larger restoration project.
If you're reading this after spotting a brown ceiling ring, bubbling paint, warped baseboards, or a musty smell that wasn't there last week, you're in the same place many Georgetown and Austin homeowners find themselves. The first reaction is usually the same. How bad is it, and what is this going to cost me?
That anxiety is understandable. Water damage doesn't stay politely on the surface. It moves into drywall, insulation, framing, flooring, trim, and sometimes the air quality of the room itself. In Central Texas, that risk gets sharper when heat, humidity, sudden storms, roof leaks, and HVAC condensation issues all collide with homes built from a mix of older and newer materials.
A good estimate isn't just about replacing drywall. It should account for where the water came from, how long it sat, what materials were affected, whether hidden cavities are still wet, and what local repair standards require before the wall is closed back up.
You Found a Water Stain Now What
A water stain rarely starts as a dramatic emergency. More often, it's a faint yellow circle over a hallway, a soft spot near a window, or paint that suddenly looks swollen around an outlet. Many homeowners hope it's old damage. Sometimes it is. Often, it isn't.
The first practical move is to stop treating the stain as the problem. The stain is evidence. The actual issue is the moisture path behind it.
What to do in the first few hours
Start with the source if you can identify it safely. That might be an overflowing sink, a supply line leak, an HVAC drain issue, or rain intrusion around a roof or exterior wall. Then document the area with photos and video before moving furniture or opening walls.
After that, focus on these priorities:
- Protect the area: Move rugs, furniture, electronics, and anything porous away from the wet zone.
- Reduce active spread: If water is still entering, shut off the fixture or water supply if it's safe to do so.
- Avoid cosmetic fixes: Don't paint over stains, caulk over entry points, or patch drywall before the structure is dry.
- Get guidance quickly: A practical checklist for the first response is outlined in what to do immediately after water damage in your Central Texas home.
The visible mark is often the smallest part of the job. Drywall can look stable while insulation and framing behind it are still holding moisture.
Nationally, the typical cost to repair water-damaged walls ranges from $300 to $2,300 per wall, with the final price depending heavily on wall material and the extent of saturation, according to Yelp's water damage restoration cost guide.
Why Austin-area homes need a careful look
Georgetown and Austin homes present a mix of repair conditions. Some have standard drywall that's straightforward to remove and replace. Others have layered textures, older finishes, garage conversions, or additions where access is harder and drying takes longer. Central Texas weather adds another challenge. Moisture can enter from above during storms, from inside through plumbing or appliance failures, or from HVAC systems working hard for long stretches.
That combination is why the cheapest-looking repair isn't always the least expensive outcome.
What Really Drives Your Wall Repair Cost
Homeowners usually look at the stained section and estimate the cost based on size. In practice, size is only one part of the bill. The bigger drivers are water category, depth of saturation, material type, and access to the damaged cavity.
Water category changes the scope
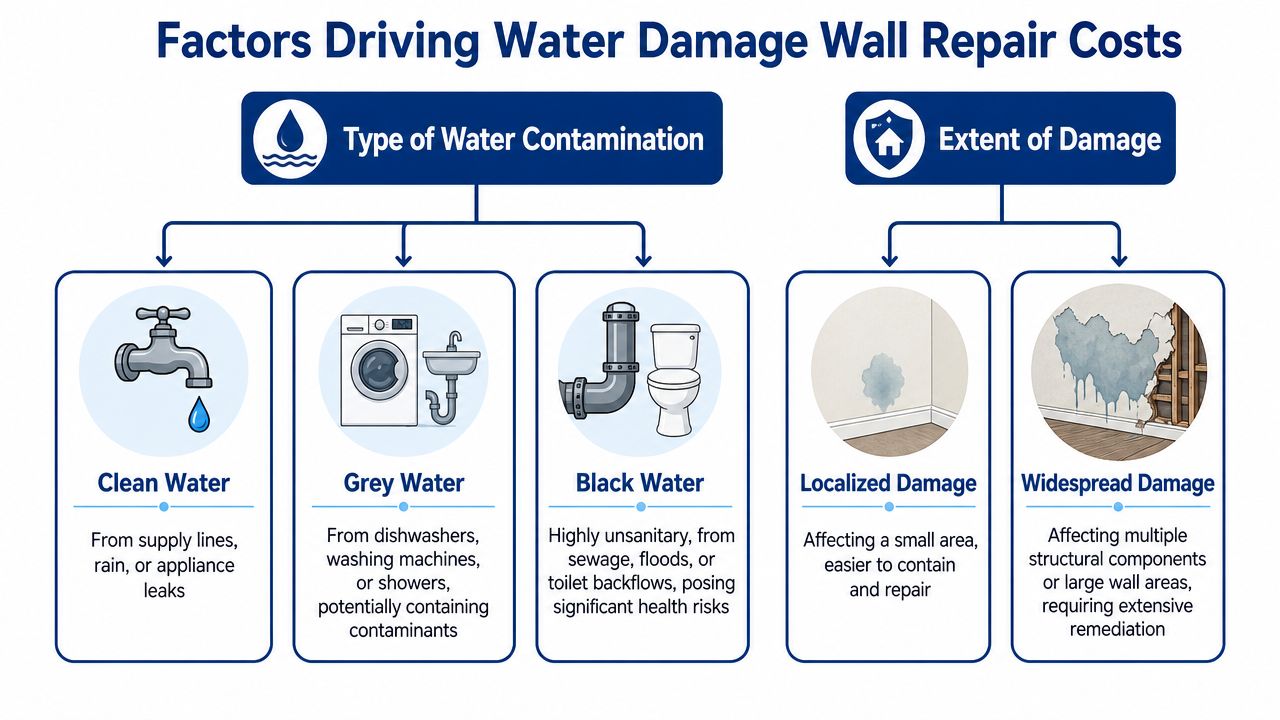
A wall wet from a clean supply line leak isn't handled the same way as a wall hit by a drain backup or floodwater. Contaminated water changes removal, cleaning, safety, and disposal requirements.
Recent 2026 data notes that Black Water repairs average $7.50 per square foot, nearly double Clean Water at $3.50 per square foot, as detailed in Angi's water damage repair cost article. That difference isn't arbitrary. It reflects decontamination work, antimicrobial treatment, and more aggressive material removal.
The wall material matters too
Drywall is usually more straightforward than plaster. Textured finishes add labor because matching the repair isn't just about patching the hole. It has to blend visually after drying and reconstruction. Tile backsplashes, built-ins, cabinets, and plumbing chases also complicate access.
A lower wall behind a vanity can cost more to repair than a larger open wall because reaching the damage takes more labor and creates more reconstruction steps afterward.
Hidden moisture is the cost trap
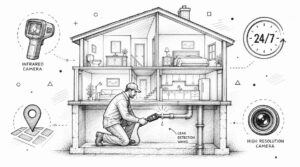
Two walls can look the same from the room side and need very different treatment. One may only have a surface stain. The other may have moisture inside insulation, along the bottom plate, and in adjacent trim. Professionals check that with moisture meters, thermal imaging, and cavity inspection rather than guessing based on appearance.
Practical rule: If the wall feels dry on the paint surface, that doesn't prove the cavity is dry.
What usually pushes a quote upward
A repair estimate tends to rise when any of these are present:
- Contaminated water: Gray or black water expands cleaning and removal requirements.
- Longer exposure time: The longer materials stay wet, the more likely they are to break down or support microbial growth.
- Multiple assemblies: A “wall repair” may also involve baseboards, insulation, flooring edges, cabinets, or ceiling transitions.
- Limited access: Tight spaces behind built-ins or within multi-story wall cavities take more time to inspect and dry.
The key trade-off is simple. A quick patch lowers today's invoice. Proper drying lowers the chance of paying twice.
Line Item Cost Breakdown for Wall Repairs
When restoration teams price a job, they don't just say “wet wall” and guess. They classify the loss by severity, then build the estimate around removal, drying, cleaning, and reconstruction. That approach gives a homeowner a clearer way to judge whether a bid is realistic.
Estimated wall repair costs by damage class
Below is a simple framework based on the standard severity concept many restoration contractors use.
| Damage Class | Description | Estimated Cost Range (2026) |
|---|---|---|
| Class 1 | Minor, isolated moisture affecting a small area with limited material impact | $150 to $400 |
| Class 3 | Nearly full-room saturation involving walls, ceilings, subflooring, and insulation, often requiring broad material replacement | $1,000 to $3,000 |
The figures above come from SuperShooters' 2026 water damage drywall repair pricing guide, which notes that Class 1 typically ranges from $150 to $400, while Class 3 runs $1,000 to $3,000 and often requires fuller structural material replacement.
What those classes look like in a real house
Class 1 is the kind of job many homeowners hope they have. Think of a small leak caught early, with limited spread and a repair area that stays contained.
Class 3 is different. Water has moved through more than one assembly. The wall cavity is wet, insulation may be compromised, and the ceiling or floor edge may be involved too. At that point, the work is no longer a simple drywall patch. It becomes a coordinated drying and rebuild project.
Common line items inside an estimate
A solid estimate usually includes some version of these steps:
- Assessment and moisture mapping: Confirming source, spread, and material condition.
- Controlled demolition: Removing only what's necessary to access wet materials and stop further deterioration.
- Water extraction if needed: This matters when the event included standing water or heavy saturation.
- Structural drying: Air movers, dehumidification, cavity drying, and daily moisture checks.
- Cleaning and microbial prevention: Especially important when water wasn't clean.
- Rebuild work: Drywall, texture, trim, primer, paint, and reinstallation of removed finish items.
If you want a starting point before scheduling an inspection, a water damage repair cost calculator for Central Texas homeowners can help frame the conversation.
A low estimate isn't automatically a good estimate. Sometimes it only means the drying scope was left out.
Three Common Austin Scenarios and Their Costs
A Georgetown homeowner notices a ceiling stain after a week of triple-digit heat, or finds swollen baseboards after one of those fast Central Texas storms that dumps a lot of water in an hour. The repair cost depends less on the stain itself and more on what happened behind the wall, how long materials stayed wet, and whether the scope stops at drywall or spreads into insulation, trim, flooring edges, or cabinetry.
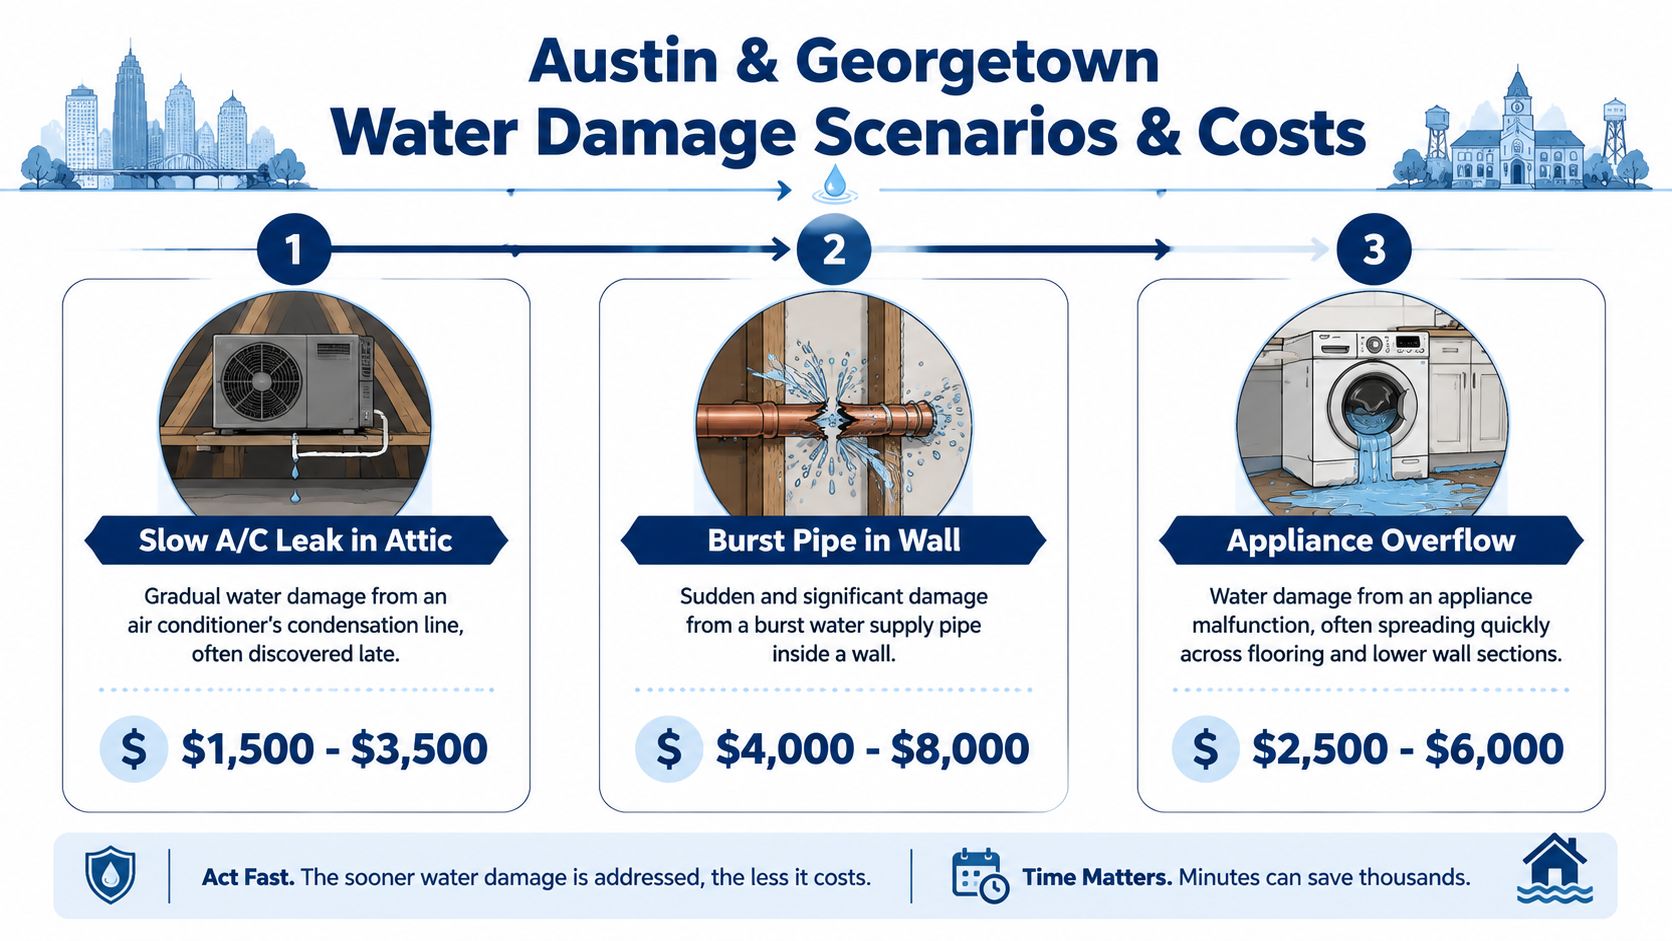
Slow A.C. leak above a ceiling and wall
This is one of the most common calls in Austin and Georgetown. Air conditioners run hard for long stretches here, and a clogged condensate line or secondary drain issue can leave you with a small stain that hides a larger wet area above the ceiling.
If the leak is caught early, the job may stay fairly contained. The work usually includes opening the affected area, checking insulation, drying the cavity, and repairing the ceiling and upper wall finish. Costs rise when the moisture has spread along framing or soaked insulation that has to be removed and replaced.
Kitchen or utility area backup at the lower wall
Damage at the bottom of a wall often looks minor at first. Homeowners see a wet baseboard or a bubbled paint line and assume the repair is just a small drywall patch.
In practice, this scenario can cost more than expected because water collects behind toe kicks, under cabinets, and along the bottom plate. If the source involved a dishwasher, washing machine, utility sink, or drain backup, the cleaning scope may also change. That means more than drying. It can mean removing a larger section of drywall, cleaning affected surfaces, checking adjacent materials, and rebuilding to match existing texture and paint.
Flash flood or heavy intrusion on the first floor
The quick-fix temptation often gets expensive. After a strong storm, some homeowners want to cut out the visibly wet drywall, run fans, and close the wall back up. In Central Texas, that approach often misses moisture trapped in insulation, sill plates, flooring edges, and adjoining rooms.
Once exterior water gets into multiple assemblies, the project shifts from a patch job to a broader restoration and rebuild. First-floor flood losses can also trigger code-related upgrades during reconstruction, especially if electrical components, insulation, or other assemblies were affected. FEMA notes that flooding can damage more than visible finishes, including wallboard, insulation, and electrical systems, which is why these losses often grow beyond the original stain line (FEMA flood cleanup guidance). Severe first-floor intrusion commonly lands in a much higher cost range than a localized plumbing or condensate leak.
A local factor homeowners often overlook
Austin-area repair pricing is also shaped by local construction details. Orange-peel and hand-trowel textures are common, open layouts make mismatched repairs easier to spot, and finish continuity matters more when one damaged wall ties into a large shared living space. In parts of Georgetown and Austin, permitting and code requirements can also affect how rebuild work is priced once damage goes beyond a simple cosmetic repair.
That is why two estimates can look far apart on the same house. One contractor may price a basic patch. Another may include proper drying, containment, moisture verification, insulation replacement, and finish matching so the repair holds up and looks right after the wall is closed.
The Hidden Dangers of a DIY Wall Repair
The most expensive mistake in wall repair isn't always ignoring the leak. It's fixing the surface before the wall is dry.
A homeowner sees a wet spot, cuts out a small section, runs a fan, patches it, and feels relieved. On the visible side, that can look successful. Inside the cavity, moisture may still be sitting in insulation, on studs, at the sill plate, or along the back of adjacent drywall.
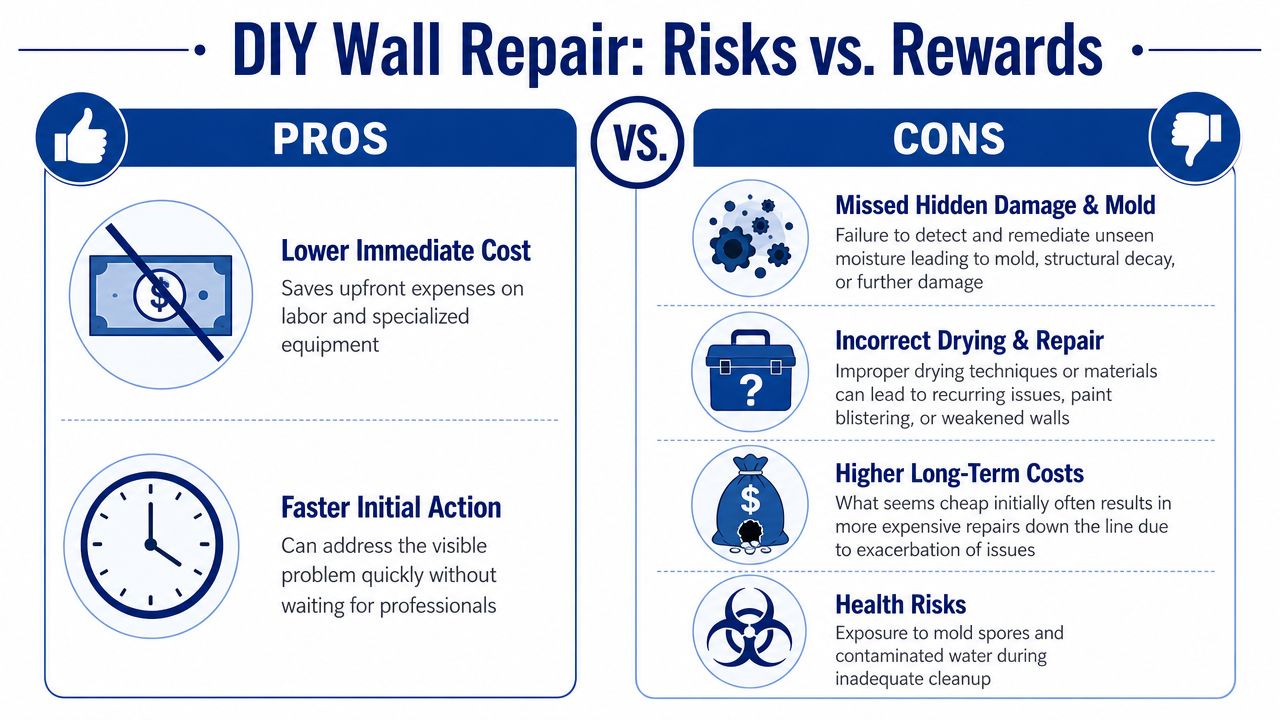
Why the quick patch feels cheaper
DIY has a powerful appeal because the visible materials often aren't expensive. A homeowner may think the repair is just drywall, tape, mud, texture, and paint. For a very minor issue caught immediately, that can seem reasonable.
The problem is that drywall repair and structural drying are not the same task.
Where DIY usually fails
Most failed DIY water repairs break down at the inspection and drying stage:
- No cavity verification: Surface touch and room airflow don't confirm internal dryness.
- No moisture baseline: Without readings, there's no way to know whether the wall has reached a dry standard.
- Premature closure: Once patched and painted, hidden moisture becomes harder to monitor.
- Missed contamination: Gray and black water require a different cleanup approach than clean water.
Data from Michaelis Corp. on the hidden expenses of at-home water damage restoration puts this in plain financial terms. A DIY repair might cost $250 initially, while the mold remediation that follows can average $1,500 to $15,000+, making the total cost six to 60 times higher when drying is skipped or done improperly.
What professional drying does differently
Professional drying isn't just “more fans.” It usually involves targeted demolition where needed, moisture readings across affected materials, thermal imaging to track spread patterns, dehumidification sized to the space, and follow-up monitoring until materials reach dry standards.
“Dry enough to touch” and “dry enough to close” are not the same thing.
That distinction matters in Central Texas, where warm conditions can mask a moisture problem for a while and then reveal it later as odor, texture failure, paint blistering, or microbial growth.
Navigating Your Homeowners Insurance Claim
A lot of homeowners call us after they find the stain and then freeze at the insurance part. That is understandable. The best first move is usually simple: document what you see, stop any active water if you can do it safely, and create a clean record before the story of the loss gets muddy.
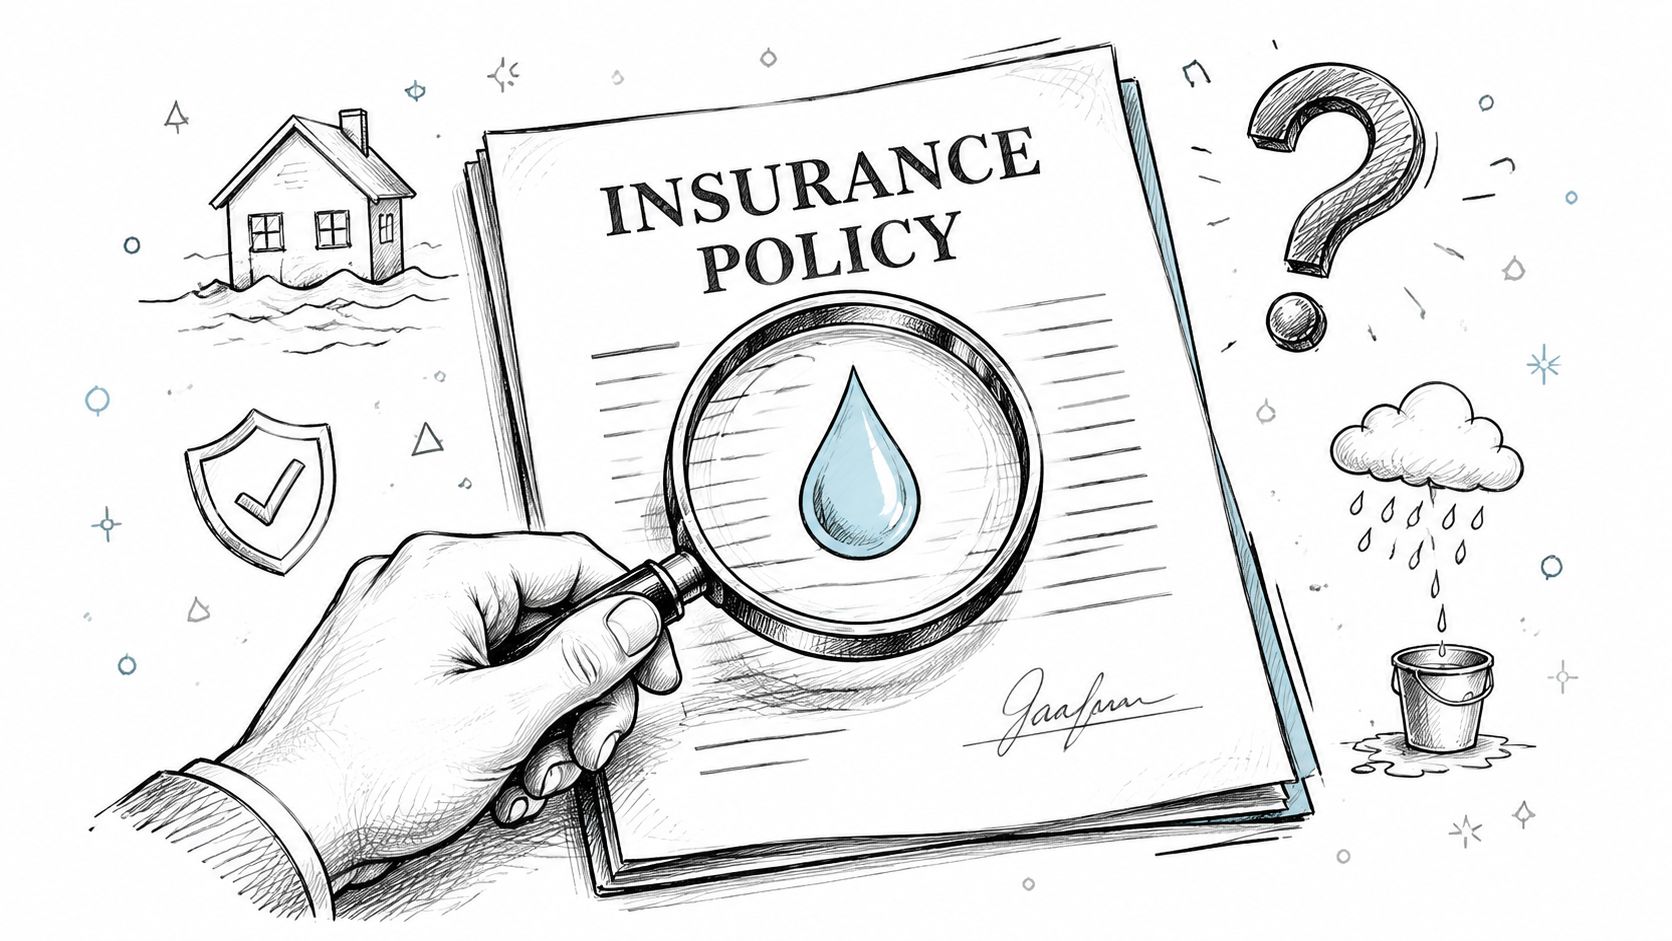
What to do before the adjuster arrives
Take clear photos and video of the wall, ceiling, baseboards, flooring edge, and any belongings nearby. If the source is visible, document that too. Write down when you first noticed the issue, when the water likely started if known, and every step taken to limit further damage.
Do not wait on claim approval if water is still active. Most policies expect the homeowner to prevent additional damage where reasonable, and that matters in Central Texas where humidity and heat can turn a small wet wall into a larger repair if drying is delayed.
Keep receipts. Keep plumber invoices. Keep mitigation paperwork.
What insurance is usually trying to confirm
Adjusters and carriers generally focus on a few practical questions:
- What caused the loss
- Was it sudden or long-term
- Which materials were affected
- What was done right away to reduce further damage
That distinction often decides whether a wall repair is treated as a covered water event or a maintenance problem. A supply line break behind drywall is commonly evaluated very differently from a slow leak that has been feeding the wall cavity for months.
Industry claim summaries from the Insurance Information Institute have shown that water damage and freezing losses can be expensive for homeowners. The takeaway is straightforward. Good documentation and timely mitigation can matter just as much as the visible repair itself.
Covered event versus maintenance issue
Homeowners often encounter difficulties. Insurance often separates sudden and accidental damage from wear, neglect, or unresolved leaks. Flooding is also handled differently from many standard homeowners policies, so storm water entering from outside may not be treated the same as a plumbing failure inside the house.
In Georgetown and Austin, that line can get blurry after heavy rain, wind-driven intrusion, or foundation-related plumbing issues. Local building standards and repair requirements can also affect the claim file once drywall, insulation, or electrical components are involved. If the wall needs opening, drying, and rebuild documentation, it helps to work with a team that handles water damage restoration in Georgetown and nearby Central Texas communities.
The practical mindset to keep
Stick to facts. Do not guess at the cause if you do not know yet. Do not throw out damaged material too early unless it creates a safety issue.
Quick cosmetic repairs can also create claim problems. If the wall gets patched before moisture conditions are documented, it becomes harder to show the full extent of the loss or explain why later paint failure, odor, or swelling occurred. In our work, the cleanest claims usually come from homeowners who document early, mitigate promptly, and avoid the temptation to make the damage look “fixed” before the wet materials are dry.
Why Georgetown and Austin Trust RestoTek TX
Homeowners in this area don't just need someone to replace damaged drywall. They need a team that understands what Central Texas water losses look like in the field. That includes storm-driven intrusion, HVAC-related moisture, plumbing failures inside slab and wall systems, and the finish-matching challenges common in Austin-area homes.
RestoTek TX is family-operated by Joan and Josh Garza and handles the full cycle from inspection and mitigation through drying, microbial prevention, and reconstruction. That matters because water losses rarely stay inside one trade. A wall issue can involve extraction, leak detection, controlled demolition, drying, testing, deodorization, and rebuild coordination.
The trust piece comes down to process. Clear communication. No-cost estimates. 24/7 response when water is still active. And a scientific drying approach that treats hidden moisture as the primary job, not just the patch and paint the homeowner can see.
When a contractor manages the entire path from wet wall to restored room, the homeowner has fewer handoffs, fewer missed details, and a better chance of avoiding repeat damage.
Frequently Asked Questions About Wall Repair
Can a wall look dry and still be a problem
Yes. Paint, texture, and even drywall paper can feel dry while the cavity behind them is still wet. That happens often when insulation or framing holds moisture longer than the visible face.
Is it always necessary to remove drywall
Not always. The right answer depends on water category, saturation depth, and whether the cavity can be dried to an acceptable standard without trapping moisture. Clean, limited damage may allow more selective repairs. Contaminated water usually pushes the project toward broader removal.
Why do two contractors give such different prices
They may be pricing different scopes. One may be estimating only patch and paint. Another may include moisture mapping, controlled demolition, drying equipment, monitoring, cleaning, and full finish matching. Ask what drying steps are included before comparing bids.
How long should I wait before repairing the wall
The wall should be repaired after the source is corrected and affected materials have been properly dried. Closing the wall too early is one of the most common reasons repairs fail later.
Does Central Texas weather affect the repair process
Yes. Heat, humidity, storm patterns, and long cooling seasons can all influence how moisture enters a home and how materials dry. That's why local experience matters, especially with attic-related leaks, rain intrusion, and HVAC condensation problems.
Should I file an insurance claim for every water stain
Not automatically. First, determine whether the stain is active, what caused it, and how large the affected area is. Small issues may be handled directly, while larger or sudden losses often justify a claim review.
If you've found a wet wall, ceiling stain, or musty room in Georgetown or Austin, RestoTek TX can help you move from uncertainty to a clear plan. Their team handles emergency response, moisture inspection, structural drying, microbial prevention, and reconstruction, with no-cost estimates and practical guidance from the first call.