You're at work when a neighbor calls. A supply line has failed in your Georgetown home, and water is creeping across the slab toward the hardwood. By the time you get inside, the surface looks manageable, but water has already moved under rugs, into seams, beneath baseboards, and possibly into the subfloor.
That first response affects whether the job stays a controlled drying project or becomes demolition and reconstruction. Water damage is among the most frequent and costly homeowners insurance losses. From 2019 through 2023, about 22.6% of U.S. homeowners insurance claims involved water damage or freezing, with an average claim cost of about $15,400, according to water damage claim statistics from This Old House. The same source cites a widely used benchmark that 1 inch of water can cause up to $25,000 in damage in a typical home. Flooring often takes the first hit, but the visible floor is only one layer of the assembly.
First Steps When Water Hits Your Floor
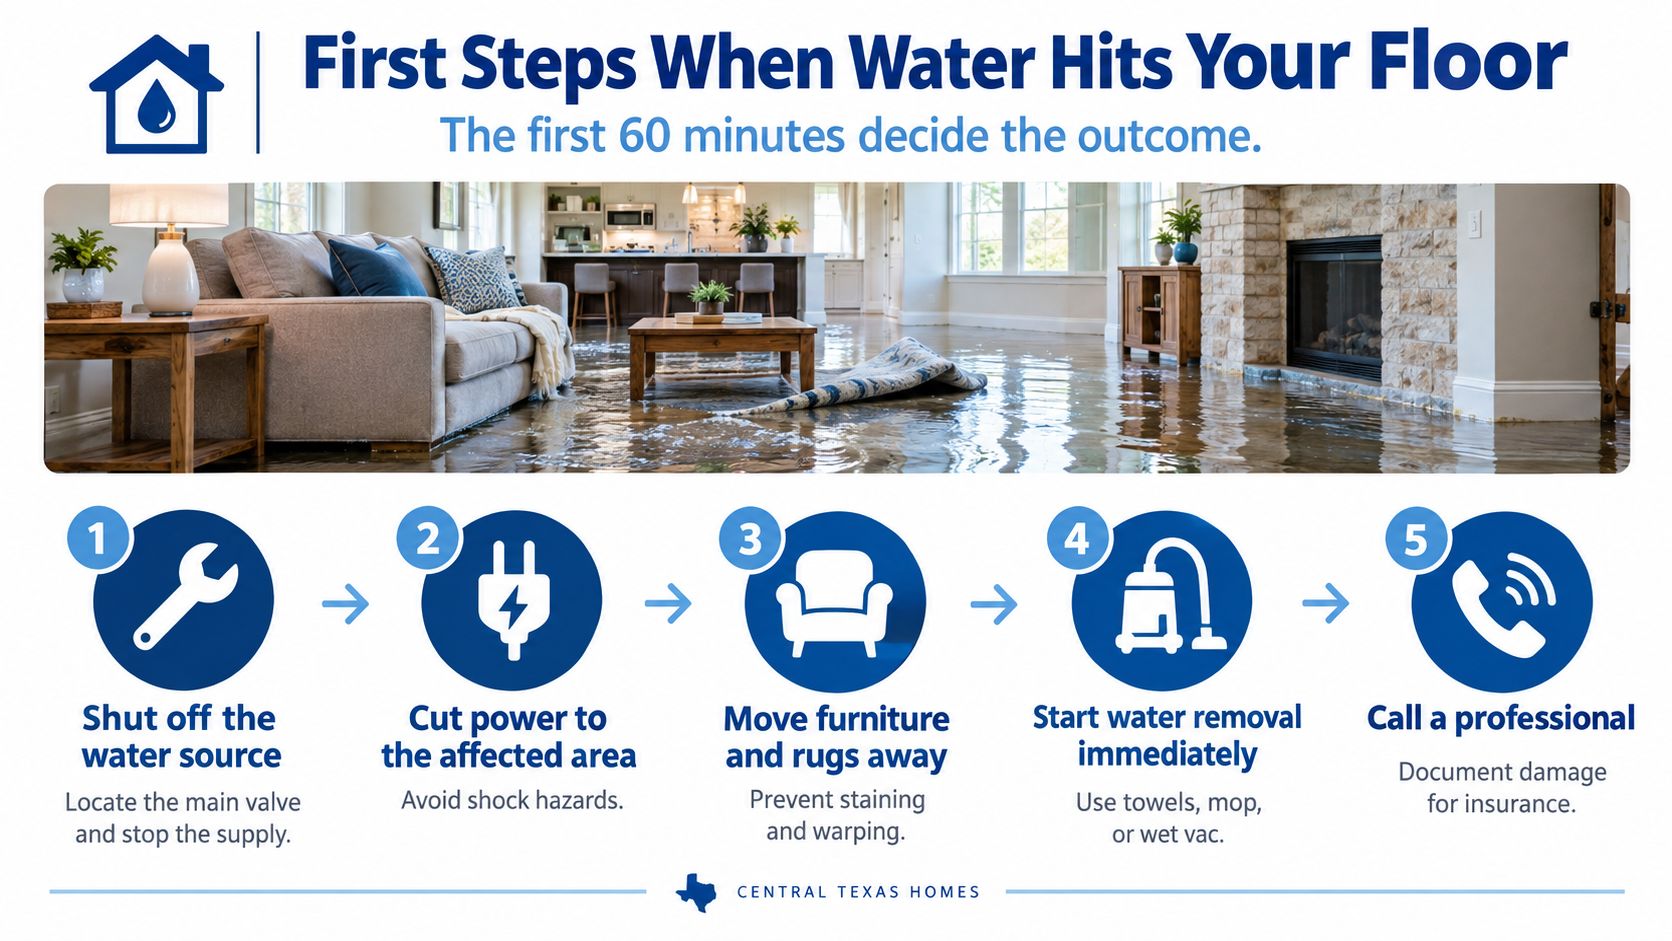
The first hour is about safety, source control, documentation, and preventing water from spreading. Don't start by pulling boards or attacking soaked carpet. Start by making sure the room is safe to enter.
Make the area safe
If standing water may have reached outlets, appliances, cords, or floor-level electrical components, shut off power to the affected area at the electrical panel, but only if you can do so without stepping into hazardous water. Keep children and pets out. Wet flooring is slippery, and a damaged ceiling, wall, or cabinet can create additional risks.
Water from a backed-up drain, sewage line, overflowing toilet, flood, or questionable sump should be treated as contaminated. Don't use a household fan to blow potentially contaminated droplets through the home. Leave that work to a mitigation crew equipped for containment and protective cleanup.
Stop the water and document the loss
Close the main water valve if a broken supply line is still flowing. If the problem is a failed angle stop, appliance hose, or fixture connection, shut that valve only when it's accessible and safe. A plumber may need to cap the line or repair the source before drying can proceed.
Take clear phone photos and video before moving too much. Capture the source, waterline, affected rooms, swollen trim, wet contents, floor transitions, and any visible staining. Photograph items you move, and keep damaged materials available for inspection unless they create a safety or sanitation hazard.
Move rugs, baskets, cardboard, lightweight furniture, and removable contents away from the wet area. Leave heavy built-ins, glued flooring, soaked carpet pad, and materials beneath furniture for the mitigation crew unless they're creating immediate danger. Pulling pad by hand without proper extraction often spreads dirty water, tears tack strip, and leaves moisture in the subfloor.
On a hot Central Texas day, set the HVAC system to fan-only if the equipment and ductwork haven't been affected. Don't leave windows open because the outdoor air feels dry. Humid spring and fall conditions can slow evaporation, and uncontrolled airflow can move moisture into adjacent cavities.
When you call a restoration company, ask for three things before equipment arrives:
- A moisture map: It should show affected rooms, materials, and readings at relevant depths.
- Psychrometric readings: Temperature, relative humidity, and moisture behavior help the crew select and adjust equipment.
- A written scope: The scope should separate extraction, drying, demolition, treatment, and reconstruction.
How Different Flooring Types React to Water
Flooring fails according to its layers, not its appearance. A tile surface may look fine while water travels through grout and perimeter joints. Hardwood can feel dry on top while the underside and plywood remain wet. In Central Texas, slab-on-grade construction adds another complication because moisture can wick upward from or remain against the concrete after surface water has been removed.
The timing below is a field-oriented guide, not a substitute for moisture testing. A clean supply-line leak behaves differently from floodwater or sewage, and the assembly beneath the finish determines whether drying in place is realistic.
| Floor Assembly Failure Modes Under Water | Water Entry Point | Visible Damage at 24-72 Hours | Failure Pattern at 1-2 Weeks |
|---|---|---|---|
| Solid hardwood over plywood | Seams, board ends, transitions, baseboards, and unfinished underside | Cupping, darkened joints, cloudy finish, swollen edges | Buckling, crowning after uneven drying, loose boards, subfloor damage |
| Engineered hardwood | Seams and perimeter edges, with water entering the layered core | Raised seams, swelling, finish changes, early delamination | Layer separation, distorted planks, replacement of affected sections |
| Laminate | Open joints, damaged edges, transitions, and perimeter gaps | Swollen edges, bubbling, soft spots, lifted seams | Expanded core, broken locking joints, widespread plank replacement |
| Porcelain or ceramic tile over concrete | Grout joints, perimeter gaps, cracks, and transitions | Damp grout, staining, moisture at slab edges or baseboards | Persistent dampness below tile, odor, failed underlayment or loose areas |
| Carpet over pad | Carpet face, seams, tack strip, and edges | Saturated pad, wicking at baseboards, tackiness underfoot | Odor, microbial contamination, damaged tack strip and subfloor |
What each assembly tells you
Solid and engineered hardwood respond to moisture imbalance. Solid boards can cup, crown, stain, or buckle. Engineered planks may separate when their core swells, even if the top veneer still looks serviceable. Don't sand a cupped floor while it's still drying. The top may flatten temporarily while the lower layers continue changing shape.
Laminate often has less recovery potential than solid wood because the core swells and the locking edges lose their fit. A glued or floating laminate floor over concrete can trap moisture beneath the planks, so surface wiping and room airflow may not address the actual wet layer.
Tile itself usually tolerates water, but the surrounding assembly may not. Grout and movement joints can channel water toward slab edges, walls, or cracks. A tile floor can therefore pass a visual inspection while the perimeter, underlayment, or adjacent drywall remains damp.
Carpet becomes a pad and perimeter problem. The pad holds water against the slab, wicks into baseboards, and wets tack strip. If the source was contaminated or the pad remains saturated, replacement is generally safer than trying to dry the carpet face alone.
For wood-specific repair decisions, the practical distinction between cosmetic finish damage, cupping, buckling, and subfloor moisture is covered in this hardwood floor water damage repair guide.
Extraction and Structural Drying Done Right
Extraction and drying are separate operations. Extraction removes liquid water. Drying changes the moisture condition of materials and the air around them until the structure reaches an appropriate, documented condition.
Remove liquid before forcing evaporation
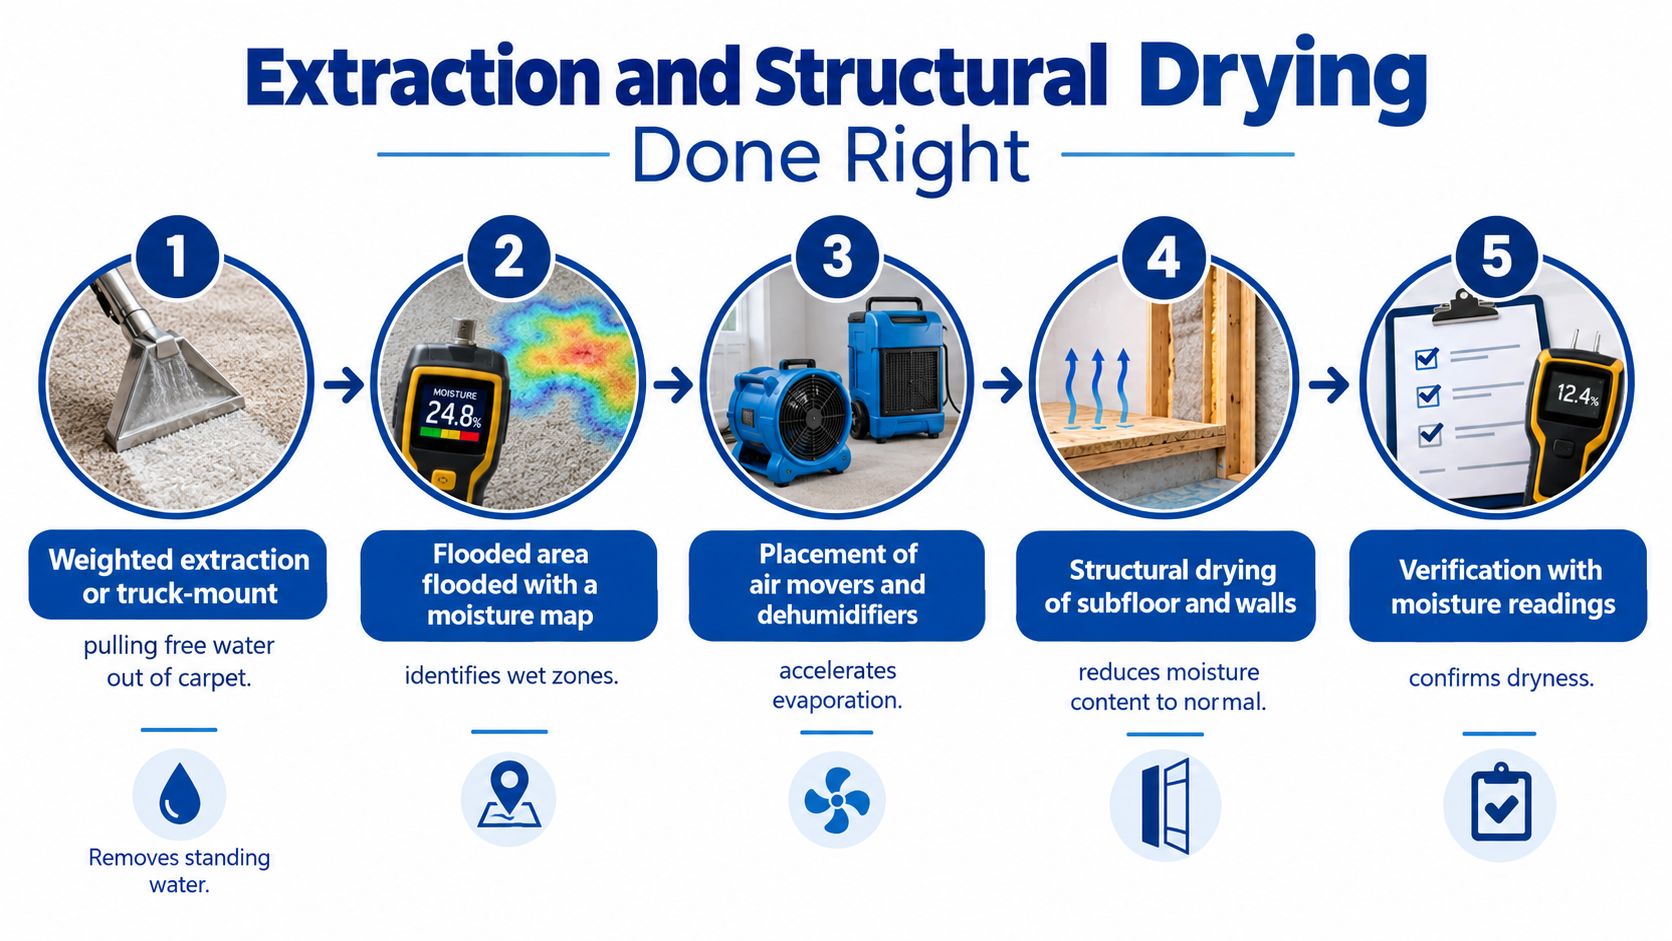
A professional crew starts with weighted extraction or a truck-mounted system when carpet, pad, or floor seams hold free water. The operator makes repeated passes until the recovery drops, rather than running fans over a saturated surface and pushing moisture deeper into the assembly.
This matters under hardwood and carpet alike. Air movement can evaporate the top while liquid remains below. That creates a misleading surface result and can prolong moisture in plywood, concrete edges, tack strip, baseboards, and lower wall sections.
Build a controlled drying environment
After extraction, the crew maps the affected area and places air movers to create a deliberate circulation pattern. In an open room, the goal is to move moisture-laden air across the floor toward the dehumidifier, not into a wall cavity or an unaffected room.
A low-grain refrigerant, or LGR, dehumidifier should be selected for the building volume and loss conditions, not for the floor's square footage. The crew then tracks the environment and material readings in a drying log, adjusting equipment when readings plateau.
Practical rule: Equipment is not proof of drying. The moisture map and the trend in readings are proof.
A competent technician may use pin and pinless moisture meters to compare surface and deeper conditions, a thermal camera to locate cold wet pockets behind baseboards or near transitions, and a hygrometer to monitor room humidity. No single instrument tells the entire story. Pinless readings help survey broad areas, while pin readings can confirm conditions at specific material depths.
In a slab-on-grade home, the concrete can continue influencing the floor long after standing water disappears. Keep dehumidification operating until the floor assembly, adjacent walls, and room environment support removal of equipment. Windows left open during humid Central Texas weather can add moisture faster than the machines remove it.
For regional drying considerations, see this guide to structural drying in Central Texas.
Dry in Place or Tear It Out
The dry-in-place decision should never come from a quick glance at the surface. It depends on three inputs: the moisture map, the water's contamination level, and the construction of the floor assembly.
Start with the assembly
A tongue-and-groove hardwood floor over plywood may be a candidate for controlled drying. A crew might remove selected baseboards or floor panels, use mat-based drying, and monitor the boards and subfloor each day. If readings continue to fall and the boards remain stable, preserving the floor can make sense.
Engineered planks with a swollen MDF-type core are different. Once the core has distorted or the layers have separated, drying may stop further damage but won't restore the plank's original shape. Glue-down laminate over concrete is another difficult candidate, especially when water has reached the adhesive layer and the planks have swollen.
Tile often stays in place when it's structurally sound, but the crew may need to inspect edges, adjacent drywall, underlayment, and cracks. Carpet pad is less forgiving. A saturated pad, particularly after contaminated water exposure, commonly becomes a removal item.
Use evidence, not optimism
The technician compares readings at the finish, subfloor, and accessible framing. A declining curve supports continued drying. Readings that stop dropping indicate that air movement, dehumidification, or selective removal needs to change.
Visible cupping across a room, black spotting at seams, or a musty odor after drying has begun also changes the recommendation. Those signs suggest that moisture or contamination remains in a hidden layer. A decision should account for the cost of preserving unstable material, not just the cost of removing it.
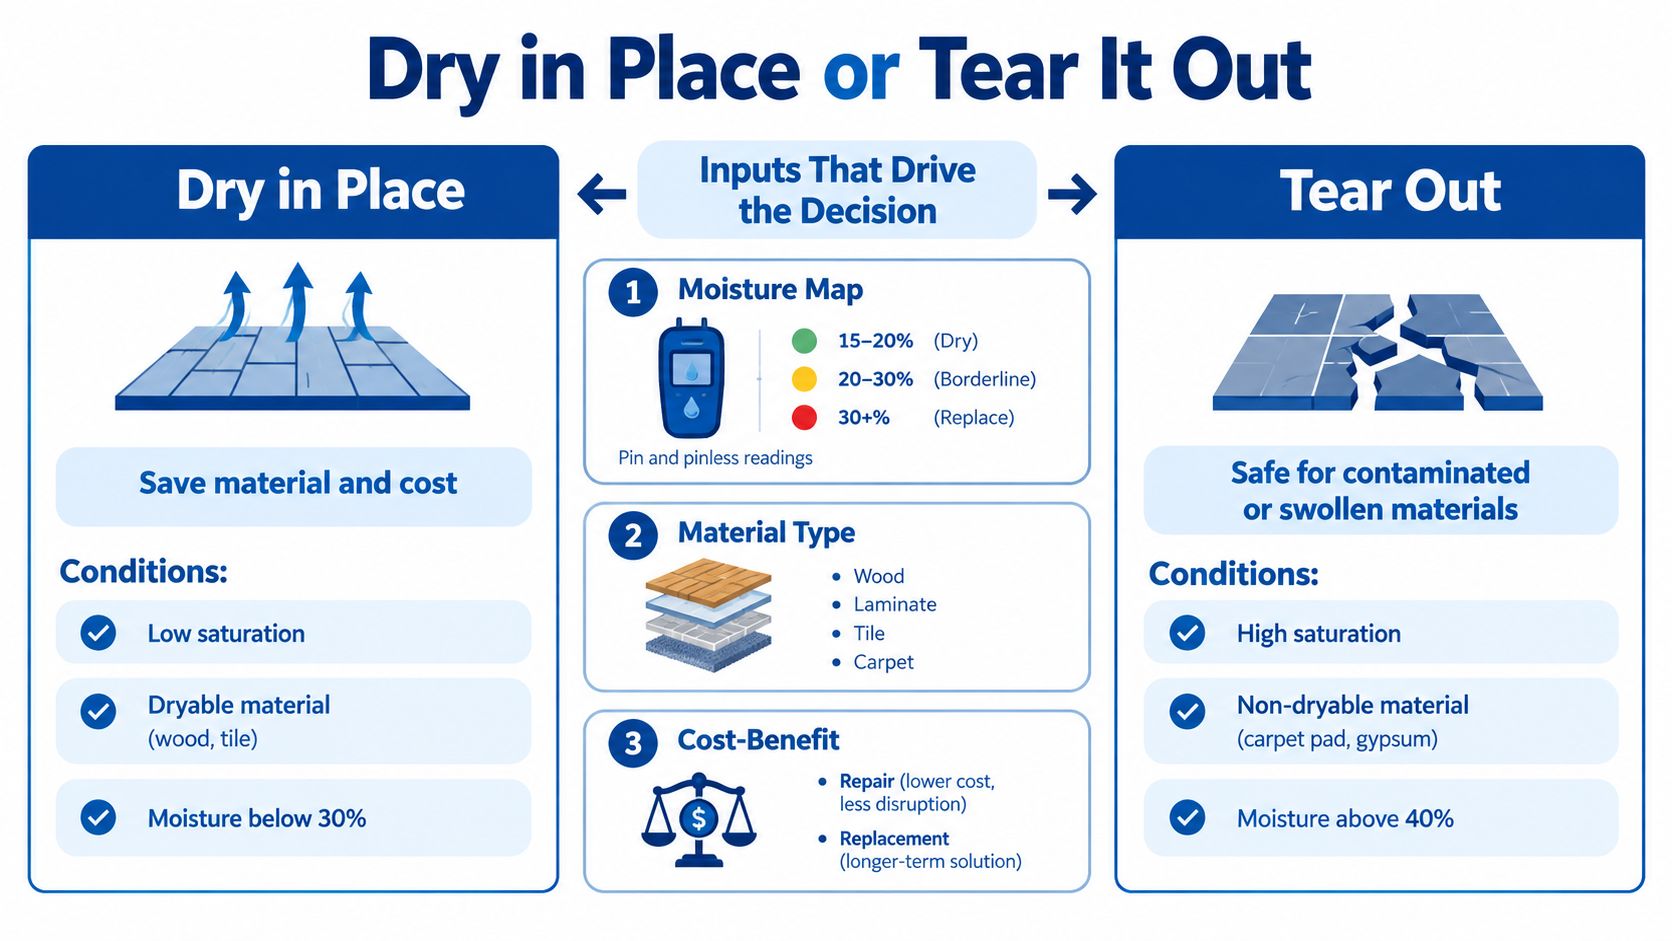
A practical Georgetown or Austin rule is straightforward:
- Clean water, a structurally sound floor, and declining readings: Dry in place may be reasonable.
- Contaminated water, saturated pad, swollen core, or stalled readings: Tear-out becomes more defensible.
- Hidden wet layers: Open and inspect before promising that the finish can be saved.
Fraunhofer IBP's building-physics work reinforces why there isn't one universal drying prescription. Drying outcomes depend on the specific wall, floor, and ceiling assembly, and testing is used to compare methods. That assembly-level approach is more reliable than telling every homeowner to “dry it fast.”
Mold Risk and the 24-Hour Clock
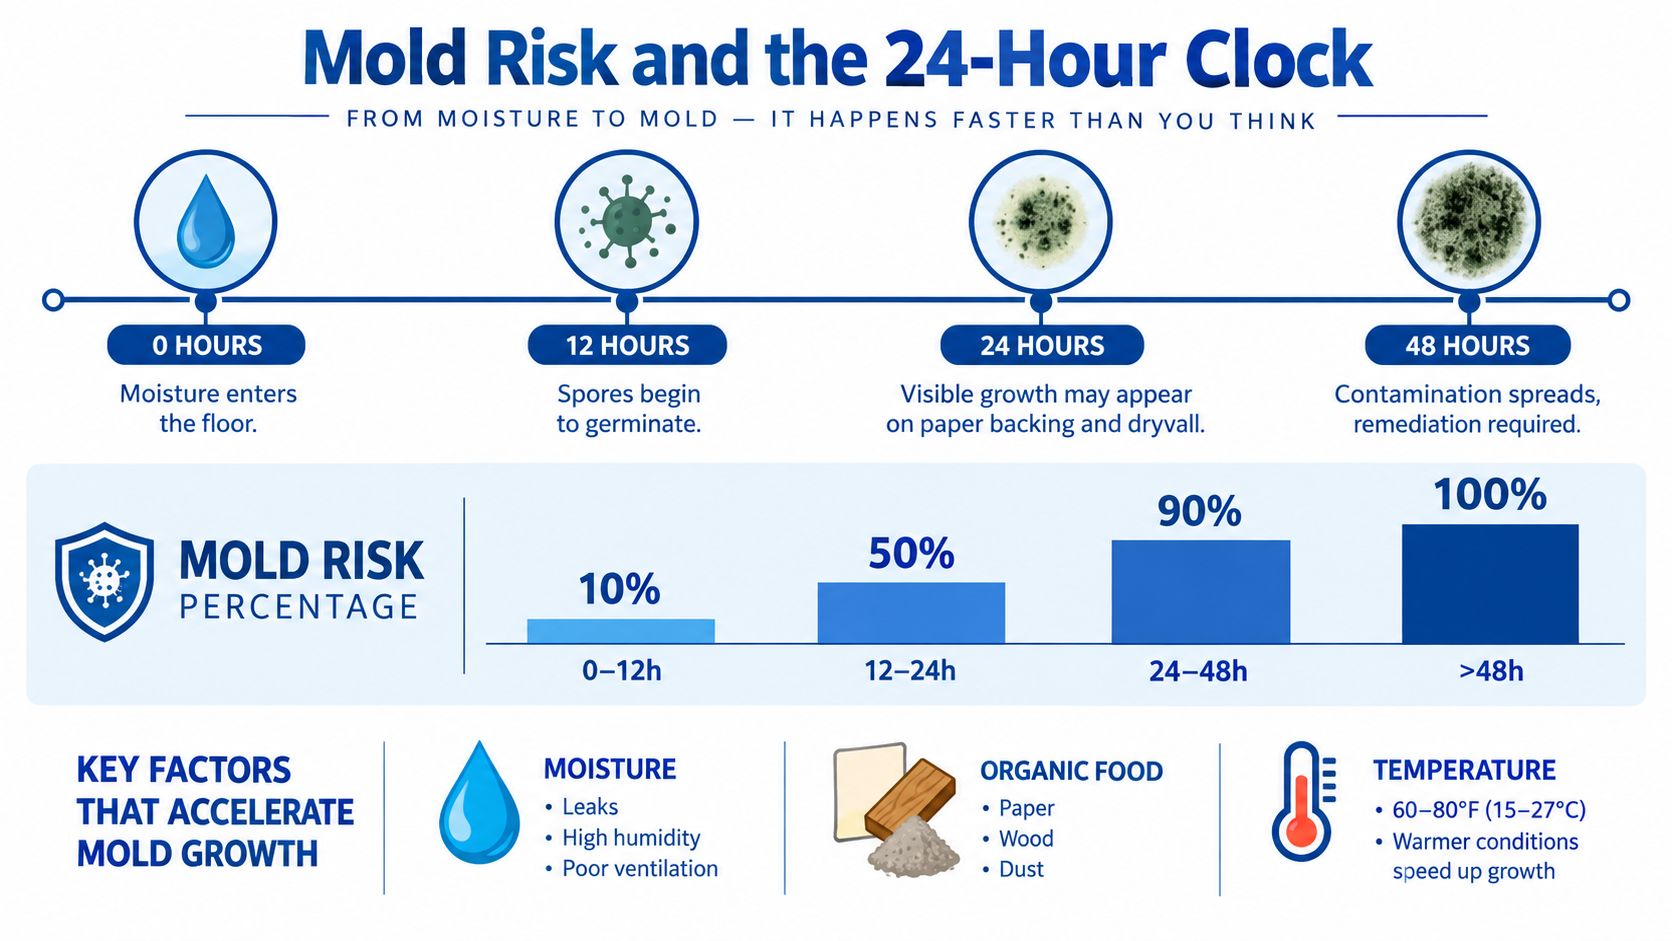
Mold risk begins with a simple combination: moisture, an organic food source, and suitable conditions. Paper backing, wood, dust, drywall facing, particleboard, MDF trim, and carpet materials can all support growth when they stay damp.
The practical concern is the 24-hour clock. Water should be extracted as soon as it's safe, and drying equipment should be operating within the first day. Central Texas flash floods can make this harder because wet carpet pad, slab edges, and wall bottoms may remain damp after a storm has passed.
Read the early warning signs
Your nose can identify a problem before the damage is obvious. A damp or earthy odor, dark spotting along baseboards, hazy grout films, and tackiness under carpet deserve investigation. They don't establish the full extent, but they tell you that surface appearance isn't enough.
Materials that remain wet beyond the early drying window become harder to preserve. After a category 2 or category 3 loss, carpet pad, particleboard underlayment, and MDF trim are frequent tear-out candidates because porous materials can hold contamination internally.
Don't clean visible growth by spraying and scrubbing without controlling the surrounding air. A restoration crew may install poly barriers, use negative-air machines with HEPA filtration, and seal HVAC returns where necessary. Those steps reduce the chance that disturbed particles travel through the home.
The right response is documentation, not guesswork. Photograph affected materials, record the source and timing, and request moisture readings that identify which layers are wet. That record helps distinguish a repairable clean-water event from a claim involving demolition, remediation, and reconstruction.
For prevention steps after extraction and drying, use this resource on preventing mold after water damage.
Repair Costs and Timelines in Central Texas
Cost depends on more than floor area. The water category, affected materials, accessibility, drying complexity, demolition, contents handling, finish matching, and reconstruction all influence the proposal.
The following planning ranges are the class-based figures provided for Georgetown and Austin losses. They're not a substitute for a site-specific estimate, and they should be read as mitigation and repair planning ranges rather than guaranteed bids.
| Floor Water Damage Repair Costs and Timelines in Georgetown & Austin | Typical Scenario | Cost per Sq Ft | Timeline |
|---|---|---|---|
| Class 1 | Small clean-water loss affecting one hardwood room with intact subfloor | $3 to $5 | Three to five days |
| Class 2 | Whole-room carpet saturation with moisture wicking up walls | $4 to $7 | Five to seven days, plus about another week for reinstallation |
| Class 3 | Supply-line loss saturating walls, ceilings, and insulation | $7 to $12 | Two to four weeks |
| Class 4 | Long-standing saturation involving hardwood, plaster, or concrete and specialty drying | More than $12 | A month or more |
Read the proposal line by line
A clear scope may separate:
- Water extraction: Removal of standing and recoverable water.
- Equipment rental: Air movers and dehumidifiers, often billed by the day.
- Contents manipulation: Moving, protecting, cleaning, or storing belongings.
- Antimicrobial treatment: Applied when the water condition and materials justify it.
- Demolition: Removal of unsalvageable pad, flooring, drywall, trim, or underlayment.
- Rebuild: New flooring, baseboards, drywall, paint, cabinets, or related finishes.
Insurance may cover sudden and accidental water damage according to the policy, but homeowners often face exclusions or limits involving code upgrades, discontinued flooring, finish matching, and moving expenses. Ask the adjuster and contractor to distinguish covered mitigation from optional improvements.
The broader restoration market reflects how specialized this work has become. A 2026 water damage restoration industry summary reported that the U.S. market was valued at $8.5 billion in 2023 and projected to reach $11.2 billion by 2028, with a projected 5.2% compound annual growth rate. The same source reported a global market estimate of $5.60 billion in 2025, projected to reach $8.97 billion by 2032, with a projected 6.93% CAGR from 2026 to 2032. Those projections describe the larger restoration sector, not a guaranteed local price.
When to Call a Restoration Professional
Call a qualified restoration professional when water has moved beneath the visible floor, the source is contaminated, or the structure can't be evaluated with household tools. A small clean spill on an isolated, nonporous surface is one situation. A soaked assembly, backed-up drain, storm intrusion, or persistent odor is another.
Use clear escalation triggers
Professional help is warranted when you find:
- Category 3 contamination: Sewage, floodwater, or water that has remained for an extended period requires controlled handling.
- Wet subfloor readings: A pin meter reading above the applicable dry standard needs professional interpretation, especially when the subfloor is inaccessible.
- Room-wide hardwood cupping: Broad movement suggests moisture below or across the assembly, not merely a finish blemish.
- Visible mold colonies: Disturbing growth without containment can spread contamination.
- Affected HVAC components: If the system circulated humid or contaminated air through ductwork, it needs inspection before normal operation.
- Stalled drying: Equipment running without a meaningful decline in readings indicates hidden moisture, poor airflow, or a material that should be removed.
Insurance carriers may request a certified restoration firm, documented readings, photographs, drying logs, and a written scope. Even when certification isn't explicitly required, a professional moisture map gives the adjuster something more useful than a verbal description of a wet floor.
During the first walkthrough, expect the crew to identify the source, check safety conditions, define the affected area, inspect adjacent rooms, measure materials, and explain what can stay versus what must be removed. Ask who will handle plumbing, mitigation, antimicrobial work, and reconstruction, and whether those scopes are documented separately.
A local provider such as RestoTek TX handles inspection, extraction, structural drying, microbial prevention, and reconstruction for water-loss events in Georgetown, Austin, and surrounding Central Texas communities. The company also offers emergency response, leak detection, plumbing support connected to losses, mold inspection, and no-cost estimates.
Keep this checklist accessible:
- Stop the source if it's safe.
- Photograph the loss before extensive cleanup.
- Notify your insurance carrier and record the claim information.
- Call a restoration professional for moisture mapping and controlled drying.
- Don't discard damaged materials until they've been documented, unless they pose an immediate health or safety risk.
When water reaches a floor, the visible finish is only the starting point. Visit RestoTek TX for floor water damage inspection, extraction, structural drying, and reconstruction support in Georgetown and Austin, and request help before hidden moisture turns a manageable loss into a larger rebuild.