You're standing in the kitchen or hallway, look up, and there it is, a brown or yellow blotch that wasn't there yesterday. In Central Texas, that usually means a storm, a roof leak, or a plumbing issue has already done its work above the drywall, and the stain is only the part you can see. If you want to know how to cover water stains on the ceiling the right way, start with the hard truth, the stain is the symptom, not the problem.
Why a Ceiling Stain Is a Symptom, Not the Actual Problem
A ceiling stain can pull a homeowner straight into cosmetic mode. That is usually the wrong move. You see discoloration after a heavy rain, grab a roller, and try to cover it before you understand what happened above the ceiling. The stain may disappear for a moment, then come back, the finish may flash, or the repair may fail because moisture is still active.
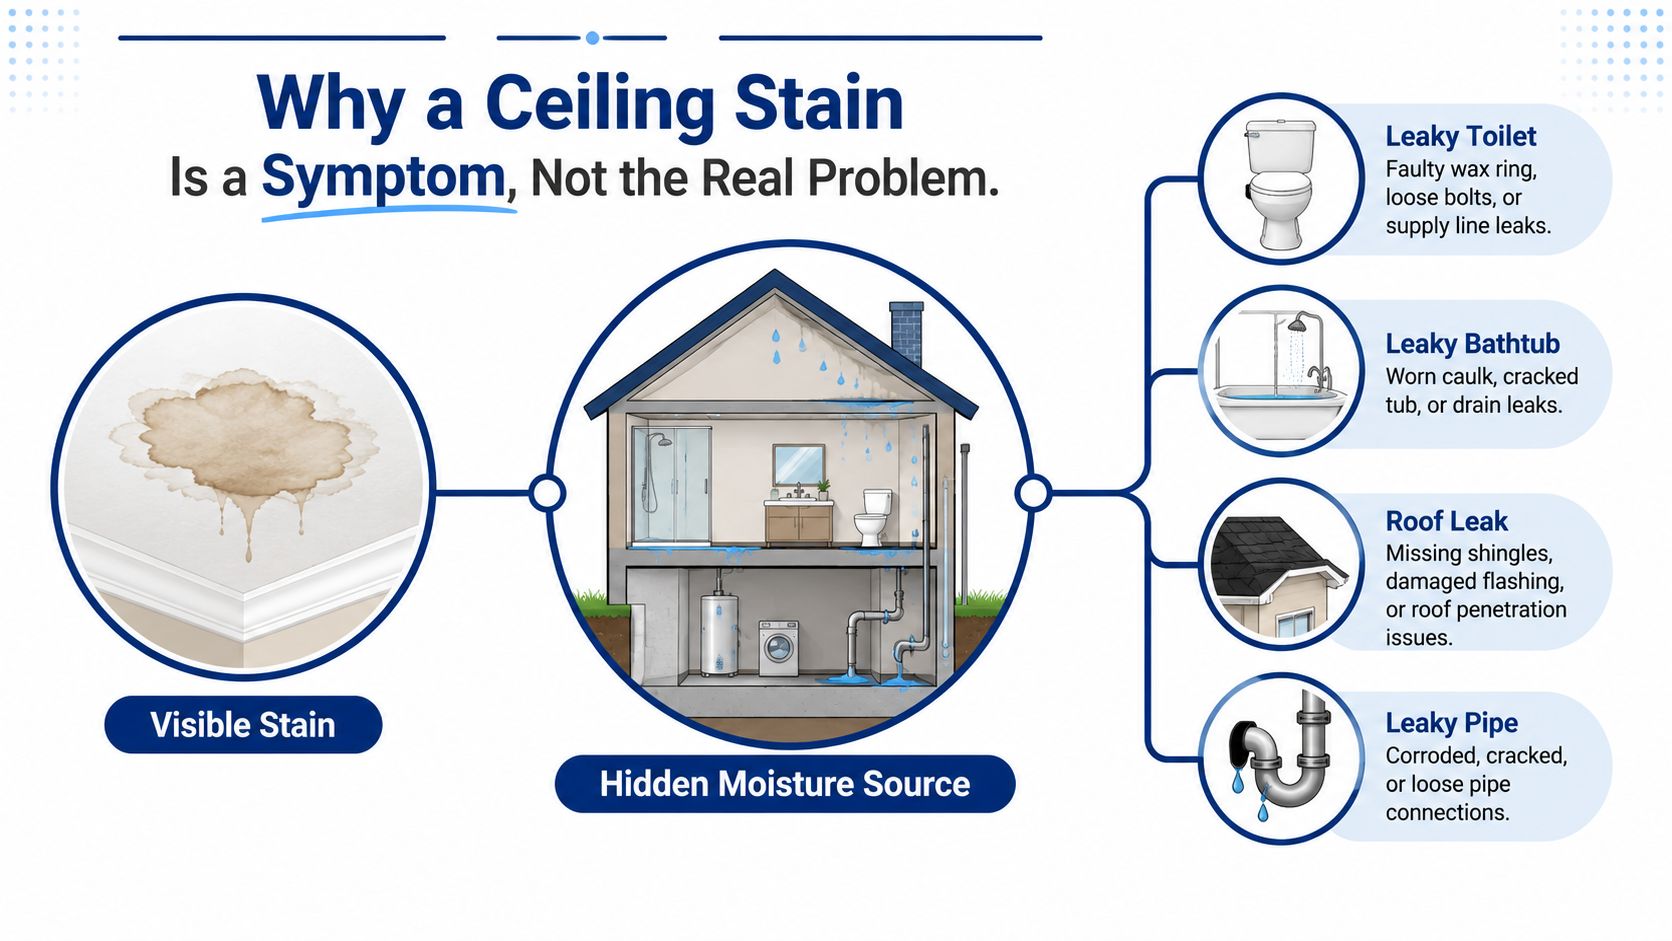
A brown ring on drywall is a clue, not a diagnosis. A stain under a bathroom usually points one way, one below an attic space points another, and one that shows up after wind-driven rain often sends you toward the roof, flashing, or soffit area. The visible discoloration can come from supply water, roof runoff, HVAC condensate, or wastewater, but each source calls for a different repair plan and a different level of cleanup above the ceiling.
Practical rule: if you have not found the leak, the repair has not started yet.
Homeowners in Georgetown and Austin see this after hail or hard rain all the time. The stain may look old by the time it shows up, but the moisture path can still be active in the attic or wall cavity, especially when insulation holds dampness against the framing. Painting over it too early hides the evidence and leaves the damage in place.
Active stains behave differently from old ones
Fresh stains usually darken after rain, spread at the edges, or show up with peeling paint, softness in the drywall, or a musty smell. Older stains can look dry and stable, but they still deserve a source check because the leak may have stopped only recently. A homeowner can sometimes tell the difference by watching the area through another storm or after fixtures above the stain are used.

The right call depends on what the ceiling is telling you. If the stain is small and the drywall is still sound, you may be looking at a contained repair. If the ceiling bubbled, sagged, or got wet enough to weaken the material, it should be treated as a moisture problem first and a painting job second. For a related example of a ceiling bubble, this guide on what to do when you find one is worth reading before you pick up a brush.
Finding and Stopping the Moisture Source
The first job is to prove the leak is stopped. Cleaning, priming, and painting only hold if the water path is fixed first. I tell homeowners to spend one hour like an inspector and save the roller for later, because the order of work matters more than the product on the shelf.
Start with the most likely culprits
Inside the house, check the fixtures above or near the stain first. Toilets, tubs, shower valves, upstairs sinks, washing machine supply lines, ice maker lines, and HVAC condensate pans are the usual places I look. In Central Texas homes, roof flashing failures after hail and wind, soffit leaks during driving rain, and attic duct sweating in summer can matter just as much.
Use a flashlight, not just a phone light. A headlamp, a small inspection mirror, and a telescoping camera or borescope help when the stain sits under a tight attic bay or a hard-to-see pipe run. Look for rust trails, swollen trim, darkened insulation, drips on framing, and failed caulk around a toilet base or tub surround. If the stain is below a bathroom, run the shower and sink one at a time, then check again from below or from the attic if you can get there safely.
If the ceiling has bubbled or sagged, treat that as a warning sign, not just a cosmetic defect. A bubble in the ceiling needs a source check first before anyone starts talking about paint.
Verify the source before you close anything back up
A moisture meter gives you a reality check. A ceiling can look dry and still hold water in the drywall core or the framing above it. Read the stained area, then compare it with a nearby dry section. Pin-style meters work well on exposed framing, while pinless meters are useful when you want a faster scan across finished drywall.
Document what you find before you change anything. Photos of the stain, the ceiling around it, and the source area help with insurance claims and help a technician trace the path later. A quick checklist also keeps the inspection honest. Check the fixture above the stain, the supply lines, the drain path, the attic or crawlspace access if there is one, and any insulation that feels damp or looks collapsed.
The right sequence is simple. Find the leak, stop the leak, and confirm the area has stabilized. Then inspect what got damaged, insulation, drywall, paint, or texture. If the source is hidden plumbing, roof structure, or anything you cannot reach without opening the ceiling, that is usually the point where a restoration pro makes more sense than a homeowner with a ladder.
Drying the Ceiling and Checking for Microbial Growth
Dryness matters more than the calendar. A ceiling that has “sat for a while” can still hold moisture in the drywall core, the insulation above it, or the framing next to it. That's why I don't trust appearance alone, and I don't trust a quick touch test either.
Drying takes air movement and dehumidification
Open airflow helps, but it isn't enough by itself if the cavity stayed wet. Dehumidifiers and fans move the project along by pulling moisture out of the air and off the materials, which is especially important after summer attic sweating or a roof leak that soaked insulation. In humid stretches, the waiting period can stretch much longer than a few days, and ceiling materials can hang onto moisture for roughly about 4 weeks before they're ready for paint, according to a widely used rule of thumb from a DIY repair reference on ceiling water stains (video reference).
That waiting period matters because trapped moisture can push discoloration back through the finish coat. It also means a stain is often a moisture warning first and a cosmetic problem second. In practical terms, if the area still feels cool, smells damp, or shows higher readings on a moisture meter, don't move on yet.
Watch for signs of microbial growth
Visible mold can show up as spotting, fuzz, or darker discoloration around the stain edge. A musty smell matters too, especially if the stain has been present for a while or the drywall was repeatedly damp. Cleaning with bleach can lighten surface discoloration, but it doesn't prove the cavity is safe, dry, or free of hidden growth.
If the stain is small, dry, and clearly tied to a one-time leak that's already fixed, a homeowner can often continue with cleaning and sealing. If there's soft drywall, recurring moisture, a persistent smell, or a stain that keeps expanding, that's a different job. RestoTek TX's roof leak drying guide is a useful reference when you're deciding whether the space is ready for repair or still needs structural drying.
Cleaning the Stain Without Damaging the Ceiling
Cleaning comes before priming, but only if the ceiling can handle it. The goal is to remove surface discoloration without soaking the drywall, wrecking the texture, or creating a new problem while chasing the old one away.
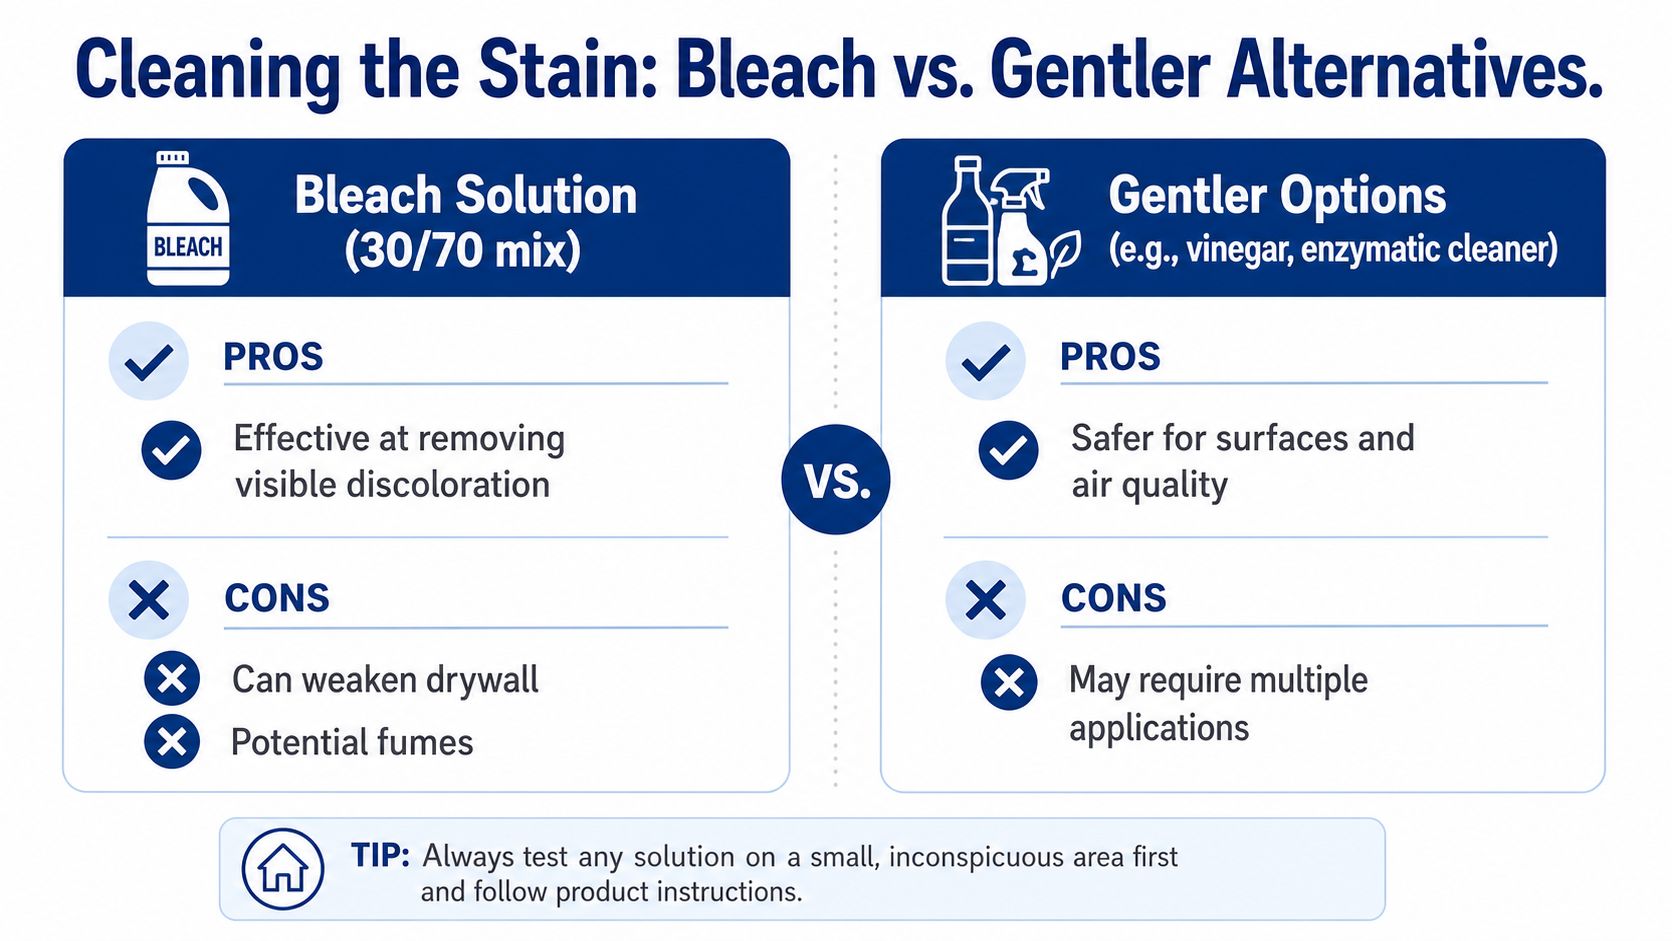
Bleach can help, but it's not the whole fix
Many step-by-step guides recommend a 30/70 bleach-to-water mixture or close variants like 1 part bleach to 3 parts water or 1 part bleach to 5 parts water for visible ceiling stains before priming (painting guidance reference). That can lighten surface discoloration, especially on a smooth ceiling with a stable, dry stain. It's still only a cleanup step. The stain barrier is the primer, not the bleach.
Use a light application. On drywall, oversaturation can soften the face paper or push moisture deeper into the material. On textured finishes, especially popcorn, too much liquid can knock loose the texture or leave a halo that looks worse than the original mark.
Choose the method by ceiling finish
Smooth ceilings are the easiest place to clean because you can control the wipe or mist without disturbing the surface. Textured or popcorn ceilings are different, and brushing them can rough up the finish. A spray bottle or light mist is often safer than a loaded brush because it avoids dragging material across the texture. The goal is to clean the discoloration, not scrub the ceiling.
If the stain is old, set, or caused by tannins, rust, or other discoloring compounds, cleaning alone usually won't solve it. That's why a stain-blocking primer becomes the decision point. Some homeowners skip the bleach step entirely on delicate finishes and go straight to primer after confirming the ceiling is dry, which is often the smarter call when the texture matters more than cosmetic whitening.
A clean ceiling that bleeds through later is still a failed repair. Seal the stain, don't just wash at it.
Choosing and Applying a Stain-Blocking Primer
A ceiling stain that has already been cleaned and dried still needs a barrier coat. Regular ceiling paint can hide a light mark for a while, but it does not reliably lock in water staining, tannin bleed, or rust. If the stain comes back after the topcoat, the job was never sealed properly.
What primer type fits the stain
Homeowners usually run into three stain-blocking primer families, shellac-based, oil-based, and latex stain-blockers. Shellac-based products are the strongest choice for stubborn stains and quick sealing, but the odor is sharp and the cleanup is more involved. Oil-based primers also block well and bond to many problem surfaces, though they usually take a bit more time to handle. Latex stain-blockers are easier to use and have lower odor, but they are not always enough for a stain that has already bled through once.
The table below is the way I'd sort them on a real job.
| Primer Type | Best For | Dry Time | Odor | Recoat Window |
|---|---|---|---|---|
| Shellac-based | Stubborn stains, fast sealing | Fast | Strong | Follow label |
| Oil-based | Tough discoloration, broad coverage | Moderate | Noticeable | Follow label |
| Latex stain-blocker | Lighter stains, easier cleanup | Varies | Lower | Follow label |
How many coats to plan for
A common approach is 1 to 2 coats of stain-blocking primer, then 1 to 2 finish coats of ceiling paint (paint-over-stains reference). Some products call for a primer dry time of about 2 hours and want the topcoat applied within 48 hours so the finish bonds well to the sealed surface. Those directions matter because once the primer fully cures, a light scuff or an extra coat may be needed before the paint will grab properly.
The failure usually shows up later. Someone primes over a ceiling that still held moisture, it looks acceptable for a short time, then the stain ghosts back through or the edges start peeling. That is not just a paint miss. It means the moisture problem was never fully dealt with.
Match the barrier to the ceiling repair
A smooth drywall patch usually takes primer without much trouble. A popcorn repair is different because the texture is part of the finish, so the primer has to seal the stain without flattening or overworking the repaired area. If you are covering a small water ring on a smooth ceiling, the right primer and solid coverage are usually enough. If you are sealing a repair after a texture patch, the primer has to hold the repaired spot and the surrounding ceiling together visually before any topcoat goes on.
When the stain came from a real leak, broken flashing, or repeated condensation, the cover-up should stop being a DIY painting project and start being a restoration job. In those cases, a contractor can dry the area, isolate the stain, and rebuild the damaged finish under one scope. RestoTek TX offers water damage inspection, structural drying, microbial prevention, and reconstruction, which fits the kind of ceiling problem that began with moisture, not a simple scuff mark.
Repairing Texture Before You Paint
A stain can be sealed and still look bad if the texture is wrong. That's the part most homeowners miss. The eye catches sheen shifts, rough patch edges, and mismatched texture long before it notices the exact paint color.
Identify the ceiling finish first
Smooth, orange peel, knockdown, and popcorn all ask for different repair strategies. Smooth ceilings need a careful skim and sand. Orange peel and knockdown need texture matching that blends the patch into the surrounding surface. Popcorn ceilings need the most caution because a brush or knife can strip texture and leave a clean circle in the middle of a rough ceiling.
Brushes are usually the wrong tool on popcorn. They disturb the texture, create drag marks, and make the patch obvious. Spray patch products or aerosol texture cans are typically the better move because they let you build the finish without physically scrubbing at it.
Feather the repair so it disappears
Feathering means thinning the patch edge so it blends into the surrounding ceiling instead of forming a hard line. If the patch edge is thick, paint will catch the difference in profile and make the repair flash in raking light. That's true even when the color is perfect.
When the damage is larger or the texture is already patchy across a big area, a full retexture can be cleaner than chasing a small invisible blend forever. The cutover point is practical, not emotional. If the repair starts to look like a patch from the doorway, it's time to reconsider the scope.
Recoat only after the finish is stable
Texture work has to be dry and solid before paint goes on. If the repair is still soft, the roller will pull it, flatten it, or expose the patch underneath. The best-looking repairs come from patience here, not heavier paint.
Painting, Matching the Existing Finish, and Final Inspection
A ceiling stain can look cured once the patch is dry, but the last coat and the final check decide whether the repair disappears or keeps showing itself every time light shifts across the room. Ceiling paint is chosen to disappear overhead, where light hits differently and every sheen change shows up faster than homeowners expect.
Use the right sheen and apply it lightly
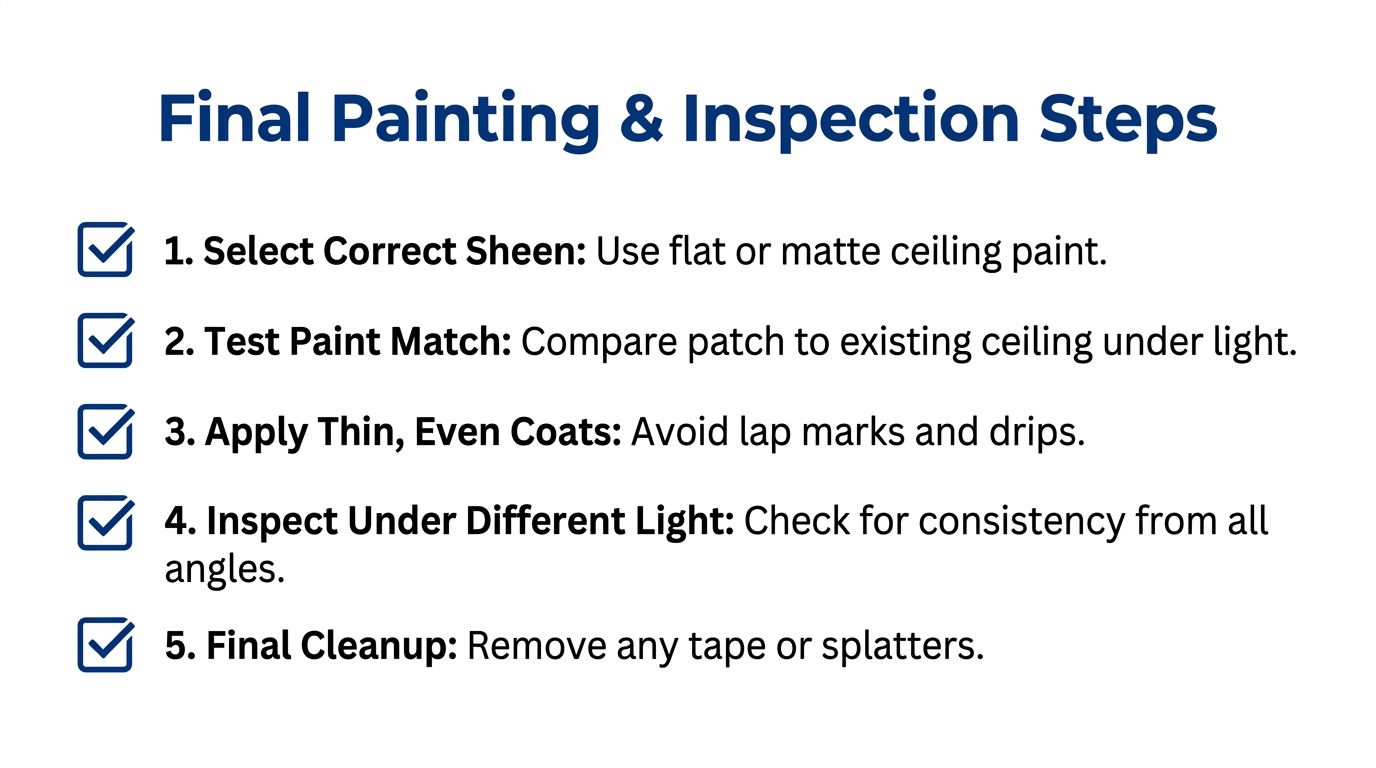
Flat or matte ceiling paint is the safer choice because it hides patch transitions better than a higher-sheen product. A shinier finish can make the repair flash under daylight or raking light and turn a successful stain block into a visible square. Thin, even coats matter more than trying to hide everything in one heavy pass.
Match the existing finish as closely as the room allows, but do not chase a perfect cosmetic match if the ceiling has already aged unevenly. In real homes, older paint can read slightly warmer, duller, or flatter than the fresh patch, and a careful blend is usually better than overworking one area until the texture starts to show. On Central Texas ceilings, that difference often shows up fastest where daylight hits near windows or glass doors.
Check the repair from more than one angle
I always tell people to inspect the ceiling with work lights from different positions, then again in natural light if possible. That catches lap marks, missed edges, and any stain bleed that did not show when the room was dim. If the stain starts to return after painting, stop and revisit the moisture source rather than adding more paint.
Use a final pass like a contractor would. The RestoTek TX final inspection checklist is a practical way to verify the repair, since it forces you to look at coverage, sheen, edges, and any sign that the stain is still active. A quick hallway glance is not enough when the ceiling has already been stained once.
Know when the job has crossed into restoration territory
Some ceilings belong to a restoration company, not a roller. If the stain is large, keeps coming back, involves sewage, Category 3 water, or shows signs of hidden damage behind the ceiling, do not keep layering paint on top of a problem. The same caution applies if there is suspected asbestos in an older Central Texas home, because sanding, scraping, or opening the area can create a much bigger hazard than the stain itself.
Final rule: if the ceiling is still changing, the project is not a paint job yet.
If the stain is active, recurring, or tied to hidden moisture, do not spend another weekend trying to paint around it. RestoTek TX handles water damage inspection, structural drying, microbial prevention, and reconstruction for Georgetown, Austin, and nearby Central Texas homes, so the repair can be handled as a moisture problem first and a cosmetic fix second. If you are dealing with a ceiling stain that will not stay gone, visit RestoTek TX and get the right kind of help before the damage spreads.