A storm is moving across Georgetown, and the sump pump is sitting in the pit. You may hear it run during a quick test and assume the house is protected. That assumption fails when the float sticks, the check valve lets water fall back into the basin, or an outage leaves the primary pump without power.
Central Texas storms test more than the motor. They test the outlet, float, intake screen, discharge line, backflow protection, and backup system as one connected setup. A practical routine should confirm that water enters the pit, the pump starts, the water leaves the property, and the system continues working when the grid goes down.
Why Central Texas Homes Need a Real Sump Pump Testing Routine
Georgetown, Round Rock, and the Austin metro can move from dry ground to rapid runoff quickly. Clay-heavy soils shed rain instead of absorbing it evenly, while drainage areas connected to the San Gabriel and Shoal Creek watersheds can send stormwater toward low-lying properties. Spring and fall often bring the weather patterns that make sump pump readiness important, but a single storm can expose a weakness at any time.
That's why sump pump testing should be a pre-storm and post-storm habit, not a once-a-year chore. Back-to-back rainy weekends leave little time for a failed pump to dry out, receive repairs, or get replaced before the next storm. Homeowners preparing for severe weather can also review this Central Texas summer storm water-damage guidance to address other entry points around the home.
A working pump helps control groundwater reaching a crawl space or basement. It can reduce the chance of saturated insulation, damaged flooring, wet stored belongings, and moisture reaching HVAC components or ducts. It doesn't make a property floodproof, but it gives water a controlled path away from the foundation when the pit begins filling.
Practical rule: A pump that turns on has only passed the first part of the test. Water must also leave the pit and continue away from the house.
Why a quick sound check isn't enough
A motor can hum while an intake screen is restricted. A float can move partway and fail to trigger the switch. A discharge pipe can be blocked outside, forcing water back toward the basin until the pump cycles repeatedly. During a power interruption, the pump may be perfectly functional but completely unavailable.
The checklist that follows treats the system as a chain:
- Activation: Power reaches the pump, and the float starts it.
- Removal: The intake stays clear, and the pump moves water.
- Discharge: The outlet line carries water away from the foundation.
- Protection: The check valve limits backflow into the pit.
- Continuity: A battery, water-powered unit, or generator can operate when the primary circuit cannot.
That sequence reflects the way storm losses happen in the field. The failure usually isn't dramatic before the rain. It appears as a quiet switch problem, a blocked outlet, a tripped GFCI, or a backup that was never tested under load.
Running the Core Pump, Power, and Float Test
Begin at the breaker panel, verify the GFCI outlet, then inspect the pit. Skipping straight to the pump can leave a tripped circuit, damaged cord, or restricted float undiscovered. Confirm the breaker serving the pump is on. The pit-area receptacle should be clean, dry, and tight. Oxidation around the plug or outlet can interrupt power in a damp utility area.
Inspect the cord before touching the water. If the pump uses a piggyback plug, make sure the pump plug is seated correctly in the switch plug and the switch plug is fully inserted into the receptacle. Keep cords clear of the float. A loose cord can resemble a dead motor, while a restricted float can look like an electrical failure.
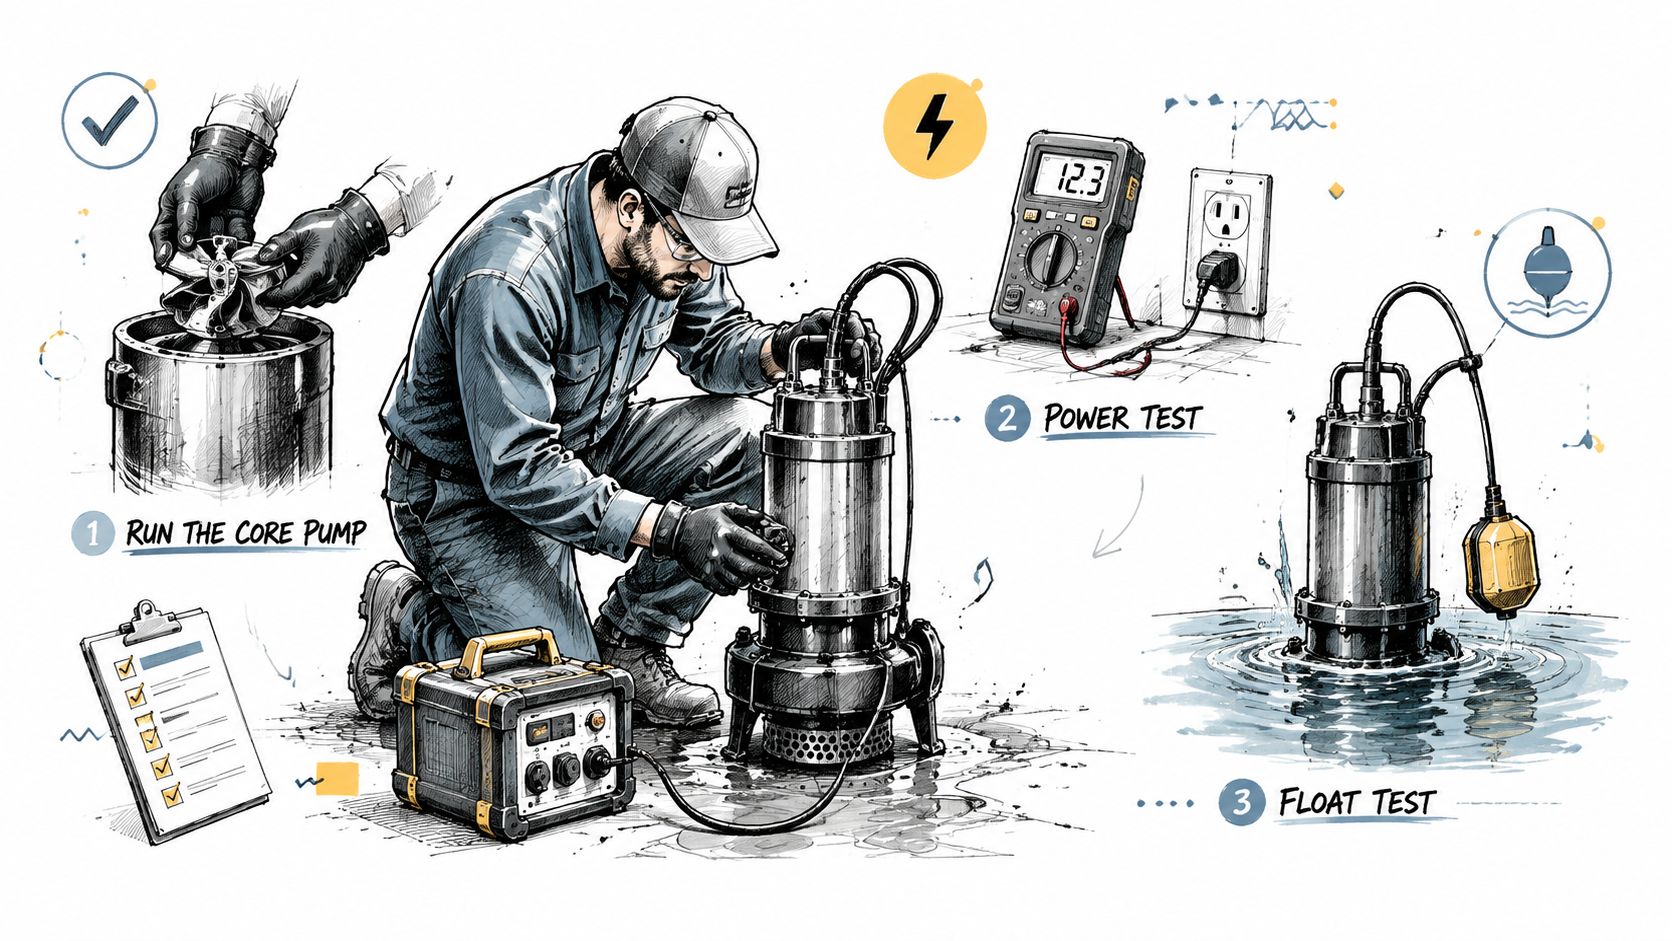
Run one controlled water cycle
Look into the pit before adding water. Remove loose debris that could reach the intake, but never reach into a powered pit or handle electrical components with wet hands. If the cover is sealed or the installation includes specific safety instructions, follow the pump manufacturer's manual.
Add water gradually until the float rises and the pump starts. A commonly used field test adds roughly five gallons, or about 20 liters, of water under controlled conditions, as described in this practical sump pump testing guide. Gradual filling lets you observe the activation point, startup, water movement, and shutoff instead of testing only whether the motor turns on.
The pump should start without grinding, rattling, or a strained groan. If a Kill-A-Watt meter or clamp meter is available and suitable for the installation, record the operating amp draw and compare it with the pump nameplate and manufacturer information. A meter reading does not confirm that water is leaving the pit.
Watch the water level fall while the pump runs. A healthy system often clears a standard pit in about 15 to 30 seconds, according to this field guidance on sump pump performance. Let the float descend fully and confirm that the pump stops cleanly. Chattering, rapid cycling, or repeated restarts can indicate a switch, check-valve, or inflow problem.
Do not run a submersible pump dry for more than a few seconds. A dry test can damage the motor and does not show whether the unit can move water through the discharge line. If the pump fails to start, trips the GFCI, or keeps running after the pit clears, stop testing and investigate instead of repeatedly resetting the circuit. For symptom patterns and possible causes, consult this guide to sump pump failure causes.
Verifying the Discharge Path and Backflow Protection
Water must leave the foundation zone for a sump pump test to count as complete. Once the indoor cycle starts, go outside and trace the discharge line from the check valve to its termination point. Confirm that water exits the pipe and lands on ground that slopes away from the foundation.
A common field target is termination at least 10 feet from the foundation, but the layout must also meet local requirements. Keep the outlet away from a neighbor's property, sidewalk, HVAC equipment, and low areas that drain toward the house. Around the San Gabriel or Brushy Creek, stormwater can submerge an outlet that appeared adequate during dry weather.
Inspect every restriction between the pit and the yard
Check the full route for crushed pipe, separated fittings, mud, leaves, and soil covering the outlet. Where the system design includes a small vent hole in the discharge pipe, verify that it remains open. A blocked vent can reduce flow or interfere with pump operation.
The check valve needs the same attention. Its flapper should move freely, and the valve must point in the correct direction. If it sticks open, water in the discharge line can fall back into the pit after the pump stops. That creates short cycling, increases wear, and can keep the basin from staying clear. A backward valve can let the pump run without producing effective discharge.
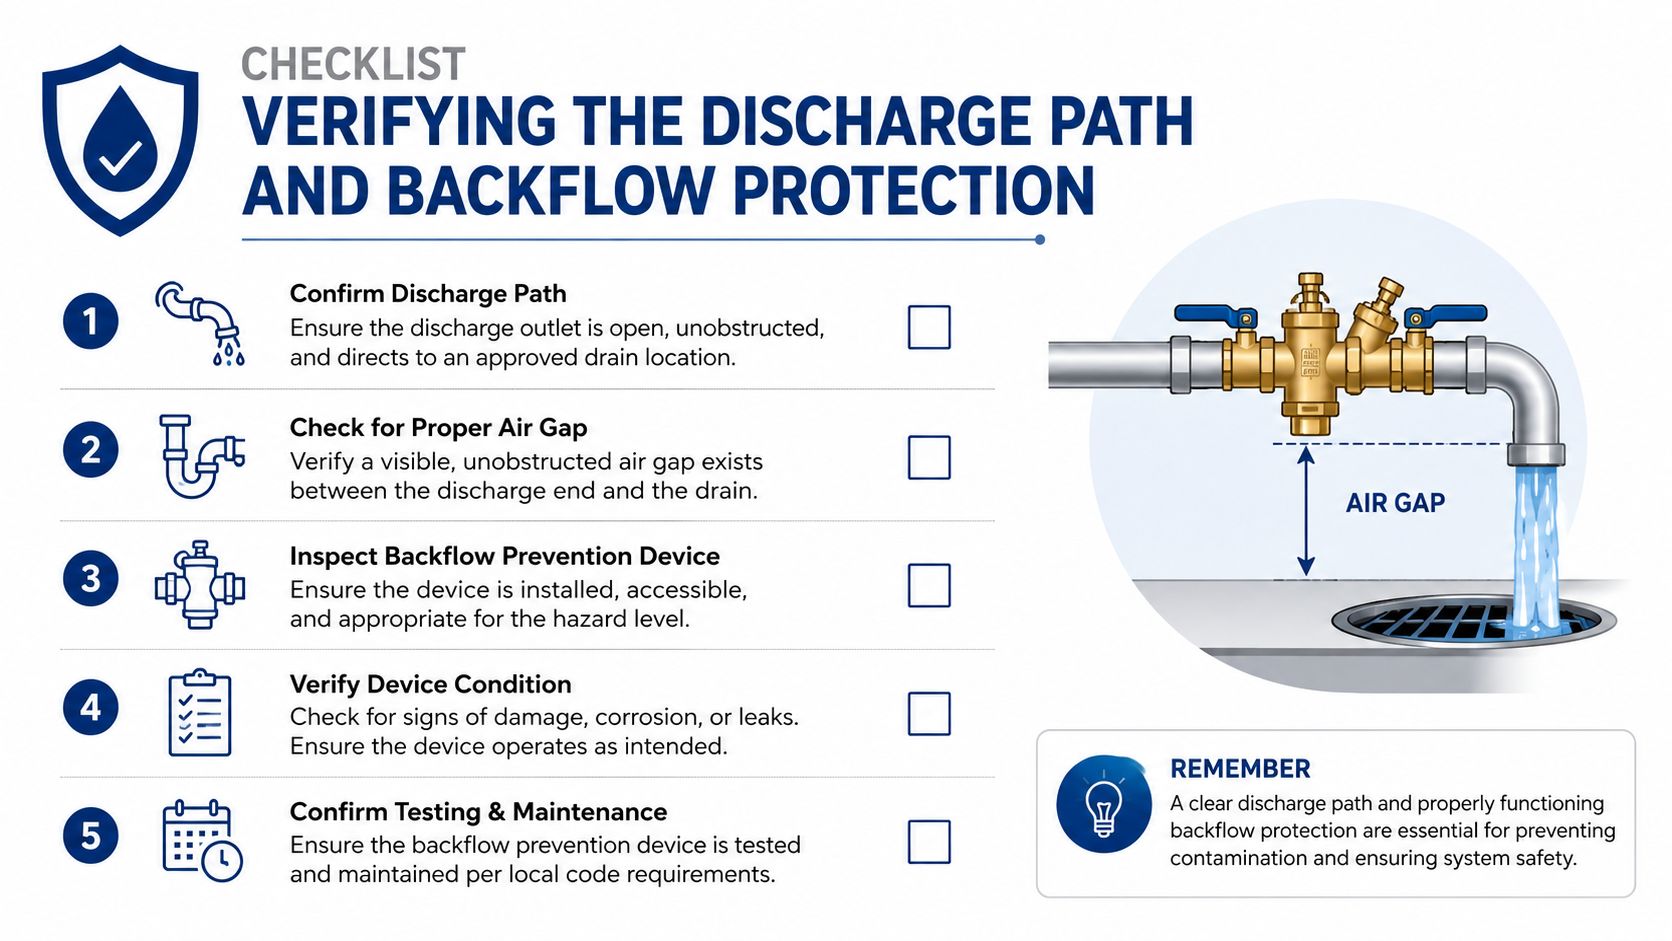
Use the water level, not the motor noise, as the result
Repeat the controlled water test while watching the outdoor termination. The pit should clear in about 15 to 30 seconds, with water visibly leaving the line. If the motor runs while the water level barely changes, shut the system down before it overheats.
An above-grade pipe can still have a blocked outlet. Storm debris may cover the opening, and rising rainwater can submerge the termination. Clear accessible obstructions only from a safe position. Excavation, buried-line damage, or a broken connection beyond the foundation requires a qualified technician.
For homes managing yard runoff, compare the discharge arrangement with this sump pump guidance for yard flooding. The goal is direct and practical: water must travel away from the structure instead of returning through the soil, pipe, or pit.
Testing Battery, Water-Powered, and Generator Backups
The backup unit should activate the moment the primary pump loses power, not when the homeowner notices standing water. In Georgetown and Austin, storm-driven outages can arrive with heavy inflow, so test the complete sequence: remove primary power, simulate rising water, and watch the backup start and discharge. A test button checks the control circuit, not the unit's ability to move water.
| Backup Type | Typical Runtime | Key Dependency | Test Frequency | Best Fit |
|---|---|---|---|---|
| Battery backup | 6 to 10 hours of intermittent cycling (field testing and enforcement guidance) | Charged battery, working charger, clear discharge | Before storm periods and after battery service | Homes needing automatic short-term coverage |
| Water-powered backup | Uses municipal water while operating | Stable city water pressure and functional valve assembly | During seasonal testing and after plumbing work | Properties with dependable municipal supply |
| Portable generator | Depends on fuel reserves and load | Safe outdoor placement, transfer equipment, and fuel | Before severe-weather periods and after repairs | Extended outages where fuel and operation are practical |
Battery systems
Deep-cycle marine batteries are common in battery backup installations. Runtime changes with inflow, pump capacity, battery condition, and cycling frequency. Check the charger indicator, battery connections, alarm, and float switch. A battery that looks charged at rest can still lose voltage under load, so run the backup through an actual water test.
Battery age also affects readiness. Published field guidance commonly recommends replacement every 2 to 3 years for this type of sump backup battery. Replace swollen, leaking, cracked, or corroded batteries immediately, then recycle them through an appropriate program.
Keep the discharge path in the test. The backup may start correctly while a blocked outlet, failed connection, or shared line prevents water from leaving the property.
Water-powered units
Water-powered backups do not depend on household electricity, but they require municipal pressure and correctly installed plumbing. They also consume water during operation. Storms that cause outages can affect pressure, so this setup does not provide automatic protection in every storm scenario.
Inspect the check valve and discharge connection, then follow the manufacturer's test procedure. Confirm that the unit moves water through the line. Valve noise alone does not show that the pit is clearing.
Generators
A portable generator can run a primary pump and other selected loads during a longer outage. Operate it outdoors, with exhaust directed away from doors, windows, and vents. An interlock kit or transfer switch must be installed and used according to applicable electrical requirements. Never create a backfeed connection.
During the generator test, place the pump under its intended electrical load and confirm that it starts without nuisance tripping. Store fuel safely and account for the possibility that storm conditions make refueling difficult. Backup readiness depends on the full setup, including power transfer, fuel, pump operation, and water discharge, rather than on purchasing the generator alone.
Troubleshooting Pump Failures That Surface After Storms
Most storm-related pump failures reveal symptoms homeowners have already noticed but not connected: chattering switches, longer run times, or water returning to the pit after the pump stops. A motor that runs only confirms that it receives power and turns. It does not confirm that the float travels freely, the intake is clear, the check valve holds, or the discharge line remains open.
Start with the least invasive checks. Disconnect power before inspecting components, and never put your hand into a live pit.
Match the symptom to the likely fault
The float rises but the pump stays off: With power isolated, move the float through its full range. Check for cords, basin walls, or debris restricting travel. When safe and appropriate, restore power and run a controlled test to confirm that the switch engages. A manual lift can expose a switch problem, but it does not prove that the pump can remove water.
The motor runs and the pit refills immediately: Inspect the check-valve flapper and confirm its orientation. A stuck-open valve allows water to return through the discharge pipe. A backward installation prevents effective one-way flow.
The pump hums but moves little water: Examine the intake screen for sediment and orange-brown iron deposits, sometimes called iron ochre. Clean only as the manufacturer permits. A restricted screen makes the motor work harder while the water level stays high.
The outlet is dry: Trace the discharge line outside. Look for a separated fitting, crushed pipe, buried obstruction, or termination covered by mud and leaves. During Central Texas storms, the pump may run continuously while the restriction sits downstream.
The circuit trips: Reset the GFCI once after checking for obvious moisture or cord damage. If it trips again, stop testing. Repeated resets can turn an electrical fault into a shock or fire hazard.
Simple electrical or float-switch problems account for about 40% of sump pump failures, according to this field troubleshooting estimate. That makes outlet power, cord seating, and float movement sensible first checks, not a reason to dismiss mechanical wear or a blocked discharge path.
Know when repair isn't the right call
Replacement deserves serious consideration when the pump is older than 7 to 10 years, the motor cycles without discharging, or the motor housing shows visible rust, as reflected in this sump pump warning-sign guide. An older pump may still start during a dry test yet lack the reliability needed during sustained inflow.
The worst time to debate replacement is during rising water and a power outage. If the motor housing is corroded, the switch chatters, or the pump cannot clear the pit under controlled conditions, schedule service before the next active weather period. A repair decision should account for the pump, its switch, the discharge route, and the conditions that exposed the failure.
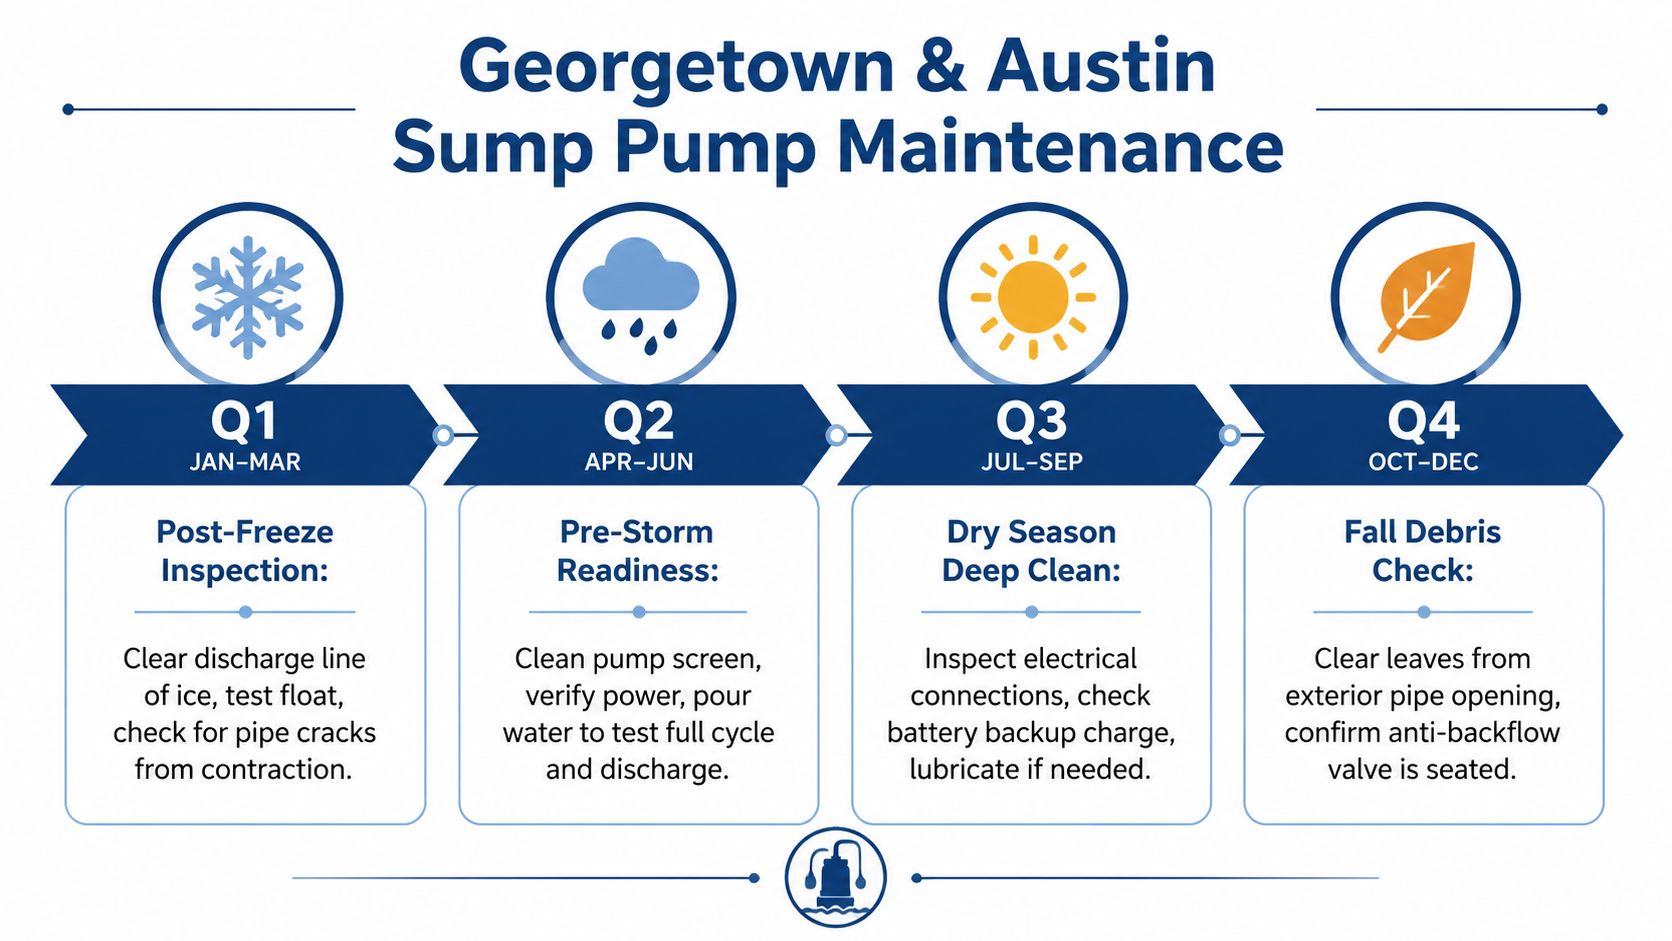
A Quarterly Sump Pump Maintenance Schedule for Georgetown and Austin
A useful schedule follows Central Texas weather instead of relying on one annual reminder. Each inspection can be a focused 15 to 30 minute homeowner task, provided the work stays within safe visual checks and controlled testing. Electrical repairs, motor replacement, and excavation should be left to qualified professionals.
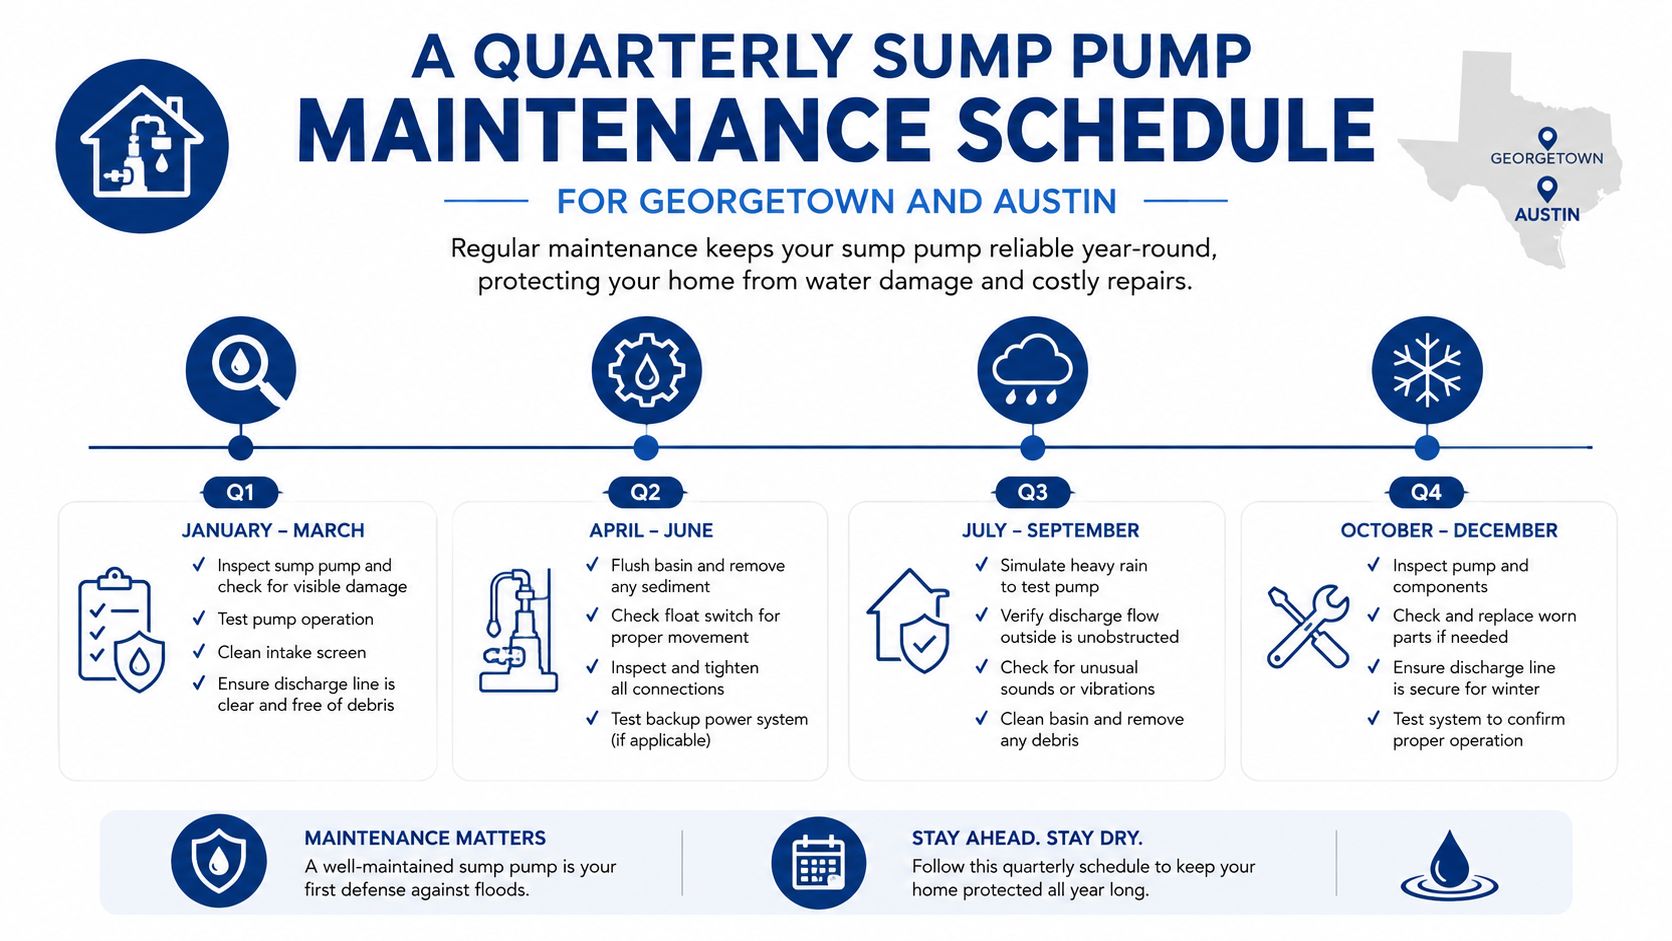
Q1 from January through March
After a freeze, inspect the discharge line for cracks, separated joints, or trapped ice. Check that the valve moves correctly and that the pit cover remains seated. Test the float and run a controlled water cycle before spring storms increase groundwater and surface runoff.
Don't ignore a small exterior split. A damaged line can direct water beside the foundation or fail only when the pump is operating under sustained inflow.
Q2 from April through June
Use this period for the complete readiness test. Verify the breaker and GFCI, clean the intake screen and basin, test the primary pump, observe exterior discharge, and run the backup under simulated inflow. Confirm the battery charger and battery condition, or test the water-powered and generator arrangements according to their installation instructions.
This is also the right time to correct poor discharge grading, loose fittings, and debris around the outlet. Repairs are easier before a storm is already filling the pit.
Q3 from July through September
During active storm weather, perform a quick test more often than you would during a dry stretch. After a major rain event, inspect the exterior termination for mud, leaves, standing water, and displaced pipe sections. Watch for longer runtime, repeated cycling, or a water level that doesn't fall as it did during the previous test.
Power outages deserve special attention. Recent coverage identifies outages as the number one cause of sump pump failure and describes monitoring products that track outage status, battery condition, and runtime (backup monitoring reference). Remote alerts can supplement, but not replace, physical testing.
Q4 from October through December
After the main storm period, remove sediment from the pit as the manufacturer allows and inspect the pump for corrosion. Clear leaves from the exterior outlet, confirm the anti-backflow valve is seated, and assess the backup battery. If the unit is nearing the replacement range or has shown repeated symptoms, schedule the work before the next weather cycle.
Call a professional for electrical faults, motor replacement, recurring GFCI trips, buried or excavated discharge lines, and any water loss that has already affected walls, flooring, insulation, or HVAC areas.
RestoTek TX provides water damage inspection, extraction, structural drying, microbial prevention, and reconstruction for storm-related losses in Georgetown, Austin, and surrounding Central Texas communities. If a failed sump pump has already put water inside your property, visit RestoTek TX for practical help from emergency response through recovery.