You shut off the faucets, checked every toilet, and walked past the irrigation controls without finding anything unusual. Yet the water meter still moves, and the latest bill is higher than expected. In an Austin or Georgetown home built on a concrete slab, that pattern deserves attention even when there's no puddle, stain, or obvious dripping pipe.
Slab leak detection works best as a stepwise diagnosis, not a checklist of symptoms followed by immediate demolition. You start with simple observations, confirm whether water is moving when it shouldn't, isolate the likely plumbing branch, and then use professional equipment to locate the failure as precisely as possible. That sequence helps distinguish a leak beneath the slab from an irrigation problem, leaking toilet, fixture issue, or drain failure.
A Quiet Problem Under the Foundation
A Georgetown homeowner in a 1990s subdivision notices an unusual change on the water statement. The household's routines haven't changed, the irrigation schedule looks normal, and every visible fixture seems dry. Still, the meter's small indicator continues turning after the home has gone quiet.
At first, the increase feels like a billing mystery. Then a child points out a warm strip of tile in the hallway during a cool January morning. A few weeks later, the baseboard near the wall begins to cup slightly, and the homeowner notices a faint earthy odor near a cabinet. Nothing looks dramatic, but the pattern is becoming harder to dismiss.
The hidden failure is in a hot-water supply line beneath the concrete slab. Pressurized water is escaping below the floor and moving into the surrounding soil. Because the pipe is concealed, the leak may announce itself through indirect clues, including changing water use, temperature differences, flooring movement, or sound, rather than a visible stream.
How suspicion becomes an urgent call
The homeowner's response often follows a practical progression:
- An unexplained water-use change creates the first suspicion.
- A moving meter shows that water may be flowing even when fixtures are off.
- Warm flooring or damp materials suggests that the issue may be inside the building assembly.
- Cupped baseboards, odors, or material changes raise the risk of secondary damage.
- A leak detection specialist is called before anyone breaks open the floor.
That sequence isn't a sign that the homeowner waited too long. Slab leaks can stay hidden because the concrete conceals both the pipe and the escaping water. The right response is to confirm the water loss, narrow the affected line, and document moisture before choosing a repair location.
Practical rule: Don't authorize broad floor removal based on a single symptom. A moving meter is useful evidence, but it doesn't identify the source by itself.
The rest of the diagnosis should answer three questions in order: Is water escaping? Which plumbing line is involved? Where is the failure located? Keeping those questions separate prevents a common mistake, treating every unexplained water-use problem as a slab leak.
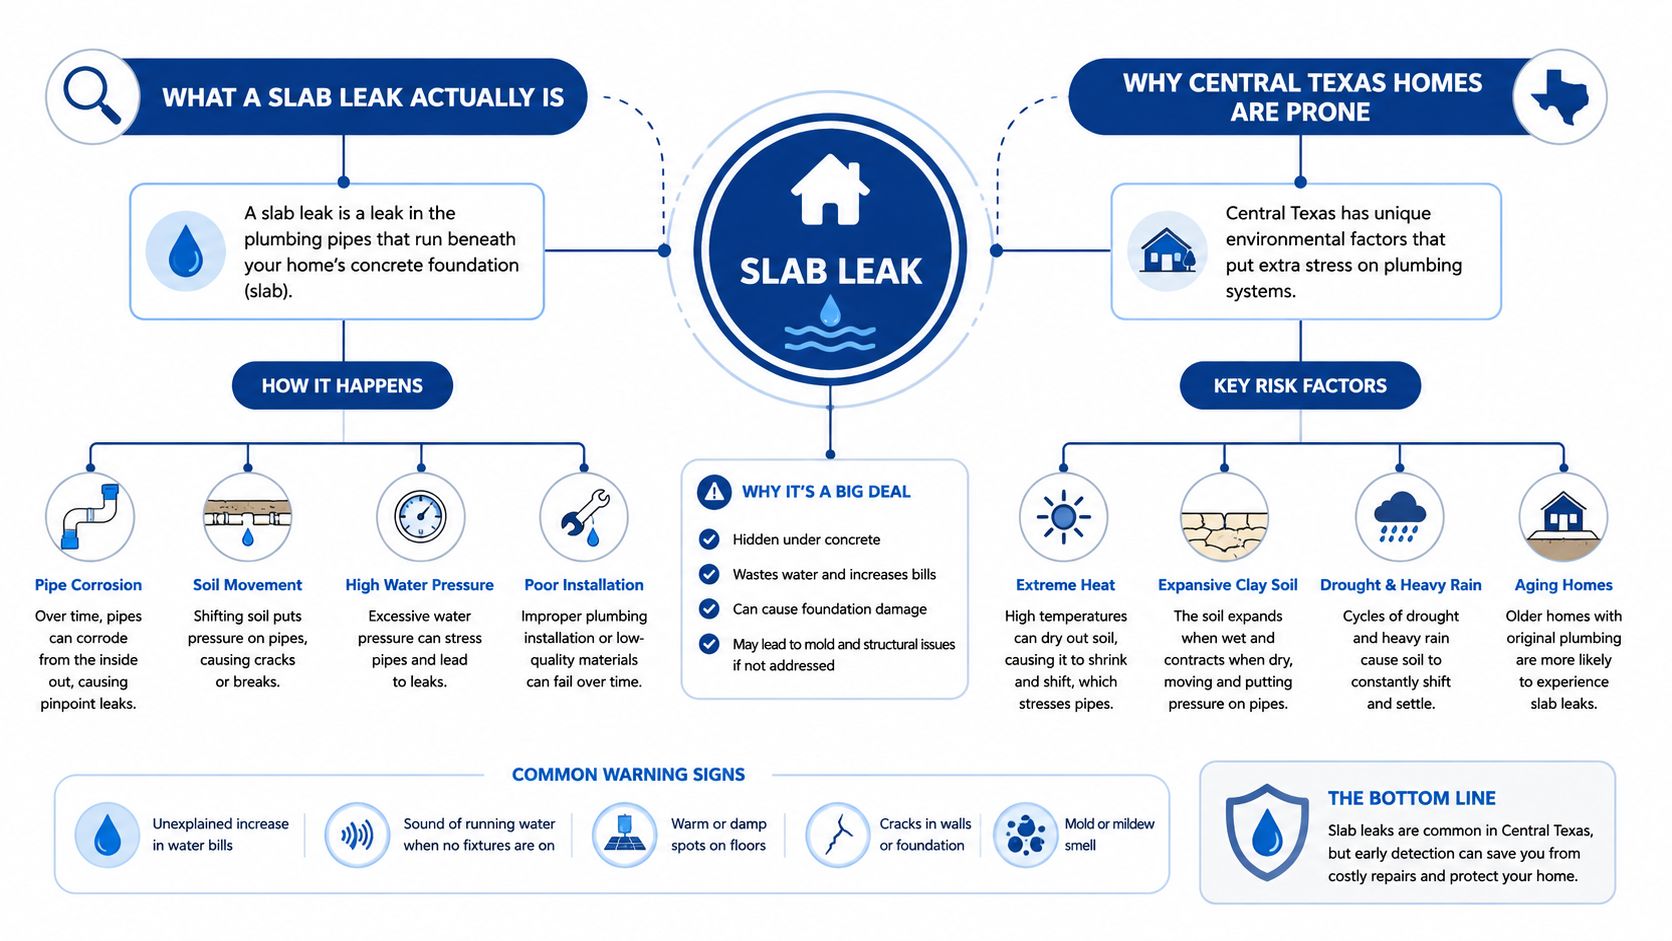
What a Slab Leak Actually Is and Why Central Texas Homes Are Prone
A slab leak is a failure in a water or drainage pipe beneath a concrete foundation. A pressurized supply line can release clean water into the soil or slab assembly, while an under-slab drain line can release wastewater when a fixture drains. Those two problems can create very different moisture patterns and require different repair decisions.
Supply-side failures commonly involve hot or cold potable-water lines. Drain-side failures involve waste piping, such as cast iron or PVC, and may appear only when a sink, shower, toilet, or appliance discharges. That distinction matters because a meter test can point toward ongoing supply loss, but it won't by itself explain every moisture condition beneath a home.
Think of the plumbing as a garden hose buried beneath a driveway. The hose is hidden, the concrete limits access, and the surrounding ground keeps exerting pressure. If the ground shifts or the hose weakens at a connection, water may escape long before the surface gives you a clear visual signal.
Why local soil conditions matter
Central Texas homes around Austin and Georgetown sit in an environment where seasonal moisture changes affect the ground around foundations. Expansive clay can swell when wet and shrink during drought. That repeated movement can place stress on embedded or connected plumbing, especially where pipes pass through rigid concrete or connect to fittings.
Home age and construction details also influence the risk profile. Some homes built during earlier construction periods routed copper water lines directly through the slab with limited protection from concrete contact or movement. Water chemistry can also contribute to deterioration at fittings and joints over time, although the exact cause must be confirmed at the pipe itself.
A homeowner shouldn't assume that every foundation crack means a plumbing failure, or that every slab leak comes from soil movement. The local conditions explain why technicians pay close attention to pipe routing, foundation geometry, material type, and the location of moisture. For a related explanation of how moisture can move through concrete assemblies, review this guide to concrete slab moisture.
A proper diagnosis also considers whether the suspected line is a hot-water branch, cold-water branch, drain, irrigation run, or another concealed utility. The floor is only the visible boundary. The actual investigation follows water behavior through the home and beneath the slab.
Warning Signs a Homeowner Can Spot Before Calling Anyone
A quiet house can still hide an active leak. You may first notice a higher water bill, a warm tile, or a faint hiss after the appliances stop. Treat these observations as clues in a diagnostic sequence, not as proof of a slab leak.
Start with the household record
Compare recent water statements with your usual indoor use, irrigation schedule, and fixture behavior. An unexplained increase deserves attention, but it can also come from a toilet that keeps refilling, a dripping outdoor faucet, or an irrigation valve. Check those accessible sources before connecting the change to plumbing beneath the foundation.
Write down when the change began and which fixtures were operating. A simple timeline helps a technician compare the symptom with hot-water use, irrigation cycles, or other possible causes.
Read the floor and nearby materials
Central Texas homes can have tile or other hard flooring directly over concrete, making temperature differences noticeable. In winter, one warm strip may draw attention, while a cool patch can appear over another area. A hot-water leak may warm the surface, but temperature alone cannot identify the source. Heating equipment, sunlight, and normal differences between rooms can create similar sensations.
Look for related material changes:
- Baseboards: Swelling, cupping, or separation can indicate moisture near a wall edge.
- Floor coverings: Carpet that stays damp without a spill deserves prompt attention.
- Grout and walls: New cracks can relate to foundation movement, moisture deterioration, or ordinary building movement. Their location and timing provide needed context.
- Odors: Musty or earthy smells near cabinets and exterior walls can suggest concealed dampness.
A wet area is easier to act on than a vague odor, but both should be documented. Photograph the location, note its size and changes, and avoid installing new flooring over it before the source is identified. A symptom can prioritize the inspection area while leaving the actual leak location uncertain, as explained in this slab leak warning-sign guide.
Listen when the home is quiet
A faint hiss, spray, or running-water sound may become clearer after faucets, appliances, and fixtures stop operating. Walk slowly through the home and listen near bathrooms, kitchen walls, water-heater connections, and floor transitions. Sound can travel through framing and plumbing, so the loudest point may be offset from the leak beneath the slab.
Record the time, location, and whether the sound changes when hot water runs or a fixture is used. That detail helps separate a possible pressurized supply-line issue from normal appliance or plumbing noise.
Standing water, flooring that is worsening quickly, a strong continuous sound, or visible microbial growth calls for faster action. Ongoing moisture can spread beyond the first visible area, so source control should not wait for a clearer symptom.
The Homeowner Meter Test and Line Isolation
A meter test is a controlled first check, not a leak locator. It answers one narrow question: Is water moving while the property should be idle? That answer helps decide whether to investigate the plumbing system, even when no damp flooring or visible water is present.
Start with a controlled no-use check
Stop faucets, showers, washing machines, dishwashers, ice makers, irrigation, and other water use. Check that toilet tanks are not refilling, and have everyone avoid using water during the observation. Record the meter reading, then watch its small leak indicator, triangle, or low-flow dial briefly. Movement suggests water is leaving the system or another connected system is drawing it. A still indicator is useful evidence, not clearance. Leaks that occur only during heat, pressure, or active use can remain hidden during a short check.
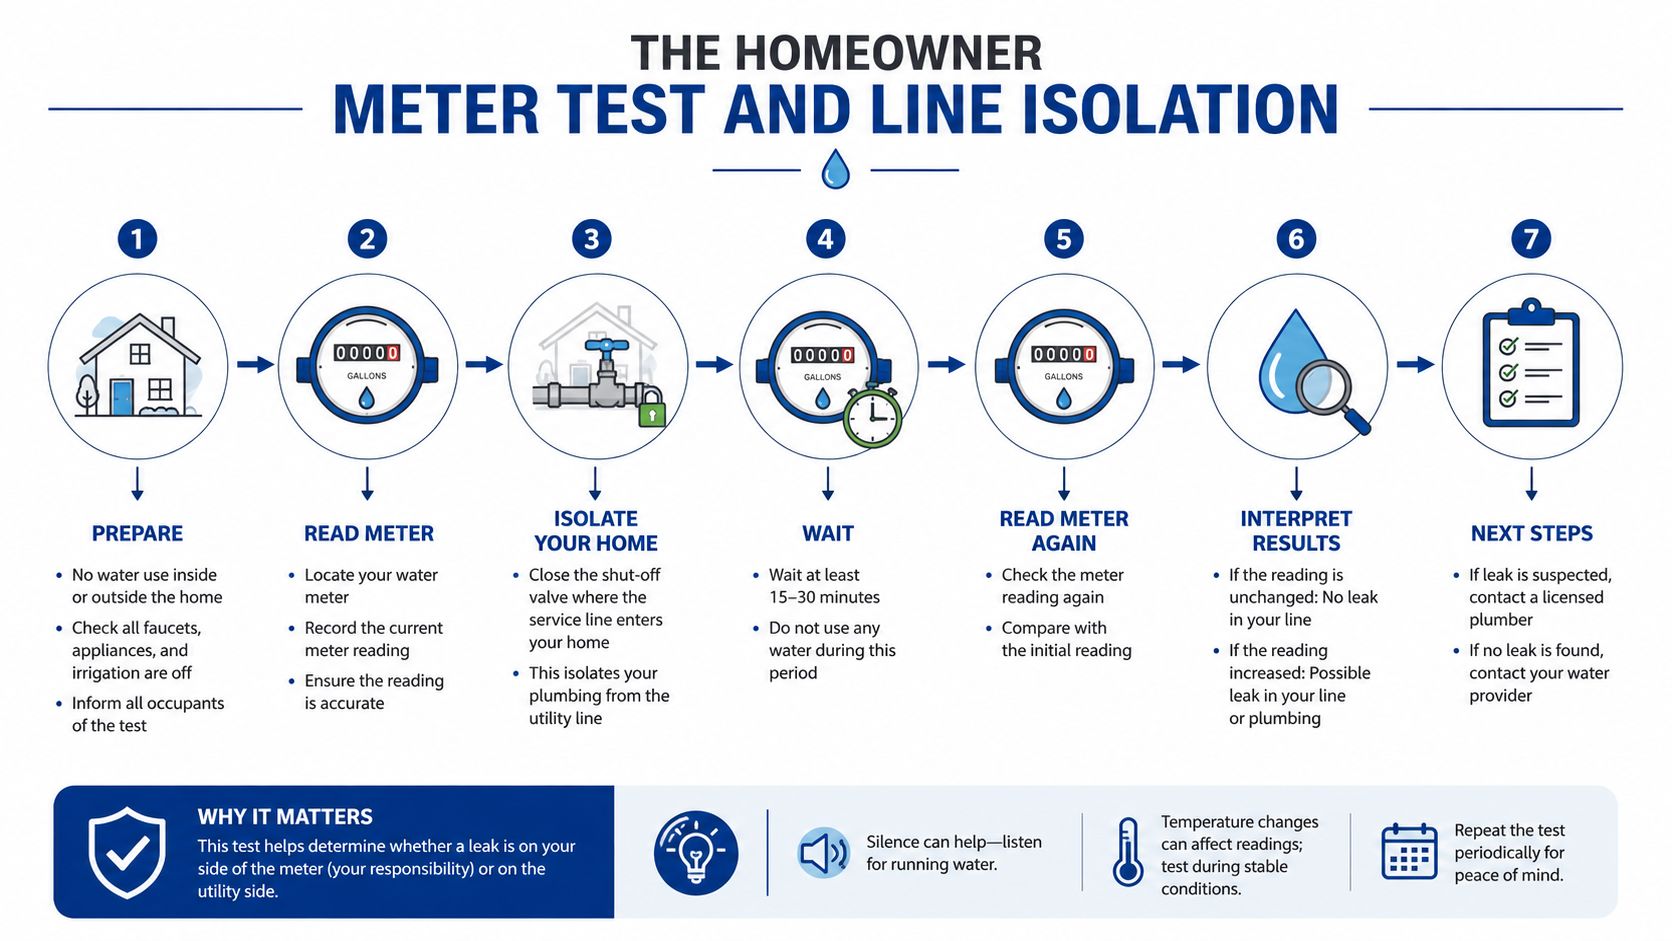
Write down what changed and what did not. In Austin and Georgetown, expansive clay soil and slab movement can complicate symptoms, so a meter result should be treated as one observation in a sequence, not a diagnosis by itself.
Narrow the line without guessing
If the indicator moves, separate the hot and cold sides. This works like closing one branch of a circuit at a time: the result can narrow the affected path without exposing the slab.
- Shut off the cold-water supply entering the water heater, then repeat the no-use observation.
- If meter movement changes, inspect the water-heater connection and hot-water branch more closely.
- A technician can isolate the hot outlet or individual branches with suitable valves and testing equipment.
- Compare each result, while recognizing that a change identifies a direction for investigation, not the exact failure point.
Hot-and-cold isolation can be misleading. A defective shutoff, fixture, or water-heater component may alter the reading, and an intermittent leak can behave differently from one check to the next. Cold-side leaks may remain in consideration even when the hot-side test produces a noticeable change.
Safety boundary: If a valve will not turn easily, stop. A broken shutoff can create a second water-loss event.
When the meter reading and isolation results disagree, call a leak detection specialist before removing flooring or opening the slab. Controlled pressure testing can confirm whether a branch is losing pressure and help determine which part of the plumbing system deserves closer inspection.
Professional Detection Methods Compared
Professional slab leak detection combines tools because each method measures a different part of the problem. Acoustic equipment hears movement, thermal cameras see temperature differences, pressure tests confirm loss, and video inspection provides visual evidence where the pipe can be accessed. A good technician interprets the readings together instead of treating one instrument as conclusive.
| Method | Best For | Limitation |
|---|---|---|
| Acoustic detection | Locating pressurized water escaping through a pipe breach | Concrete depth, soil conditions, and household or neighborhood noise can weaken or distort the signal |
| Thermal imaging | Finding hot-water line leaks that create a surface temperature anomaly | Cold-side leaks may not create a useful pattern, and heat sources can produce false positives |
| Pressure testing | Confirming pressure loss in an isolated branch | It confirms a problem but doesn't pinpoint the failure location by itself |
| Video inspection | Viewing accessible drain lines through cleanouts or small access points | It depends on access and may not show a concealed supply-line failure |
Acoustic listening
A pressurized leak creates vibration as water escapes through a breach. Ground microphones and electronic correlators can detect those vibrations through concrete and soil, helping a technician narrow the likely location without opening the entire floor.
Ambient conditions matter. Traffic, HVAC equipment, pumps, appliances, neighboring construction, and the depth of the pipe can all affect what the technician hears. The strongest result comes when the technician isolates the suspected line and compares readings from multiple access points.
Thermal imaging
A thermal camera can reveal a warm surface pattern when a hot-water line is leaking beneath the slab. Guidance for plumbers recommends creating a temperature difference of approximately 10 to 20°F before scanning, then confirming the pattern with pressure, acoustic, or isolation testing, as explained in this thermal imaging guidance for slab leaks and radiant heating.
Thermal imaging isn't a moisture detector in the same sense as a moisture meter. Sunlight, appliances, vents, radiant heating, slab geometry, and flooring materials can all create temperature differences. A warm patch is a lead, not a license to break concrete.
Pressure and video testing
Pressure testing typically isolates a branch, caps fixtures, and watches whether the line holds pressure. A pressure drop can confirm that the branch has a failure, but the gauge won't automatically identify the exact point beneath the slab.
Video inspection is especially useful for drain-side concerns when a cleanout or access point allows a camera to enter the pipe. It can show breaks, offsets, or damaged sections in accessible waste lines, but it's less useful for a concealed pressurized supply line without a suitable entry point.
Technicians must also account for slab features and unrelated voids. Post-tension components, radiant-heating circuits, and other construction details can complicate interpretation. That's why a written locate should identify the suspected line, evidence supporting the locate, and the smallest practical access area. Homeowners comparing thermal imaging leak detection services should ask how the provider confirms a thermal or acoustic finding before repair begins.
Repair Options, Mitigation, and Timelines
Once testing confirms a slab leak, the repair decision depends on the failed material, the number of previous failures, the leak's location, and the condition of the remaining plumbing. The cheapest access method isn't always the lowest-risk long-term solution.
Spot repair or rerouting
A spot repair opens the slab near the confirmed failure and replaces a short pipe section. It can make sense when the failure is isolated, the access point is practical, and the rest of the plumbing is in good condition. Accurate detection matters because a misplaced opening increases demolition without improving the repair.
A partial or full repipe abandons some or all of the buried line and routes new plumbing through accessible areas such as walls, ceilings, or an attic. Rerouting may be more appropriate when leaks recur, the buried system is deteriorated, the pipe material has a known history of failure, or the homeowner is already renovating.
Control water before reconstruction
Mitigation begins with source control, not new flooring. The immediate priorities are to stop or isolate the water, remove standing water, protect contents, and document affected materials. Moisture can remain beneath flooring, inside baseboards, and around wall edges even after the visible surface feels dry.
A restoration assessment may include moisture readings, extraction, air movement, dehumidification, odor treatment, microbial prevention, and documentation for an insurance claim. Concrete can dry slowly, and reconstruction should follow measured conditions rather than a calendar promise.
What the schedule usually looks like
Emergency isolation may happen the same day. Detection often occurs within one to three working days, while a spot repair may take a day once the failure has been located and access is prepared. Larger reroutes can require two to five days, followed by drying and reconstruction work, depending on the scope and the property's condition.
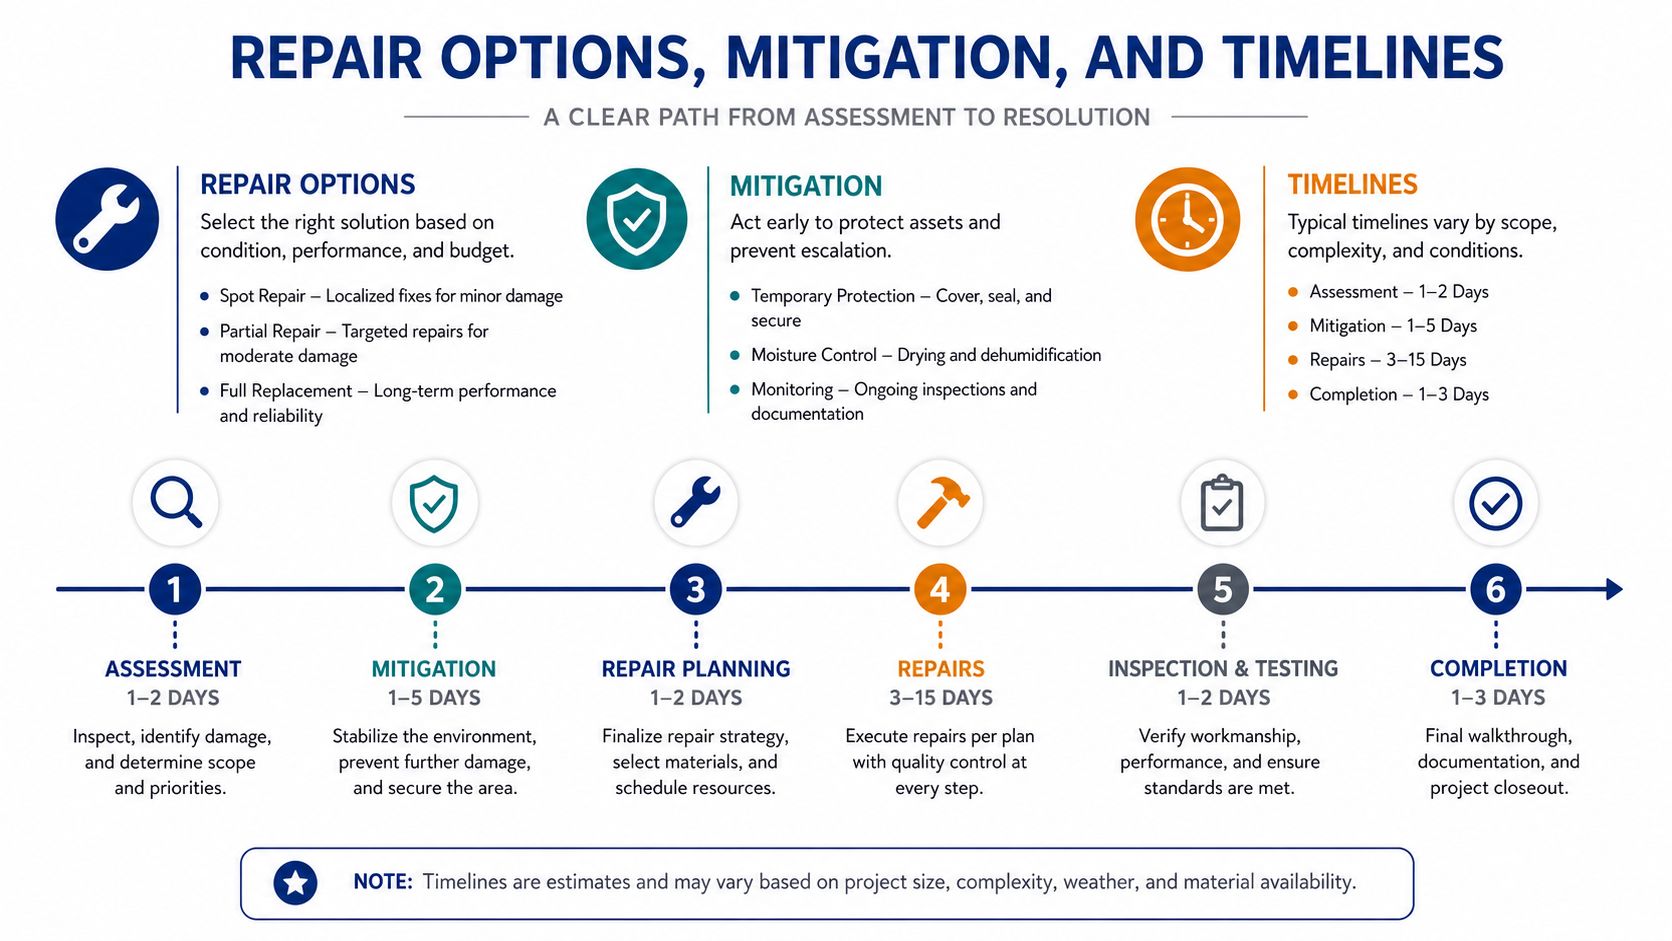
Those timeframes describe workflow stages, not guarantees. A repair can be completed while moisture remains in the slab assembly. The flooring, drywall, trim, and insulation should be evaluated before reconstruction closes the area again.
Your Action Plan for an Austin or Georgetown Property
Use this sequence when you suspect a slab leak:
- Confirm the water movement. Shut off every fixture and appliance, pause irrigation, and observe the meter. Record what you see instead of relying on memory.
- Check easy alternatives. Inspect toilets, exterior hose bibs, irrigation controls, water-heater connections, and visible supply lines. A hidden leak isn't automatically a slab leak.
- Isolate carefully. If the valves operate safely, compare the hot and cold systems. Stop if a valve is stuck, damaged, or leaking at the stem.
- Book targeted detection. Ask a licensed plumber or leak detection professional to use pressure testing, acoustic listening, thermal imaging, video inspection, or a combination suited to the suspected line.
- Request a written scope. The report should distinguish a pressurized supply failure from a drain-side failure, identify the suspected access point, and explain the evidence behind the locate.
- Choose the repair path. Compare spot repair with rerouting based on pipe material, failure history, access, and expected remaining service life.
Central Texas soil conditions make post-repair observation important. After the source is controlled, ask for moisture readings around baseboards, flooring, cabinets, and other affected materials. Dehumidification may be necessary, and a monitoring plan across the next two billing cycles can help identify whether water use has returned to its normal pattern.
Call a restoration professional promptly if you have standing water, visible mold, warped flooring, or a leak that has continued for more than 24 hours. For planning purposes, you can review information about leak detection service costs, but the immediate priority is stopping water and documenting the condition.
RestoTek TX provides leak detection, water extraction, structural drying, microbial prevention, and reconstruction support for properties in Georgetown, Austin, and surrounding Central Texas communities. If your meter is moving or your flooring is showing unexplained moisture, visit RestoTek TX to request help with inspection and next-step planning.